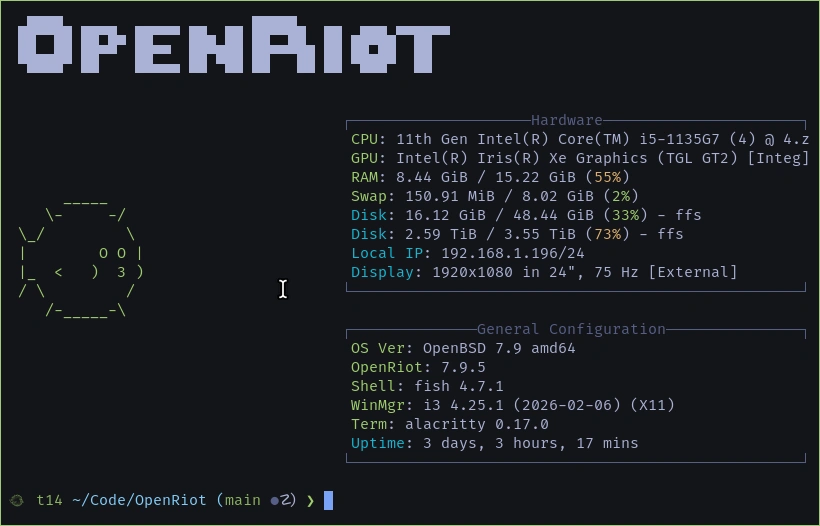
𝕆𝕡𝕖𝕟ℝ𝕚𝕠𝕥
One command. Complete OpenBSD desktop. Zero compromises.


𝕆𝕡𝕖𝕟ℝ𝕚𝕠𝕥
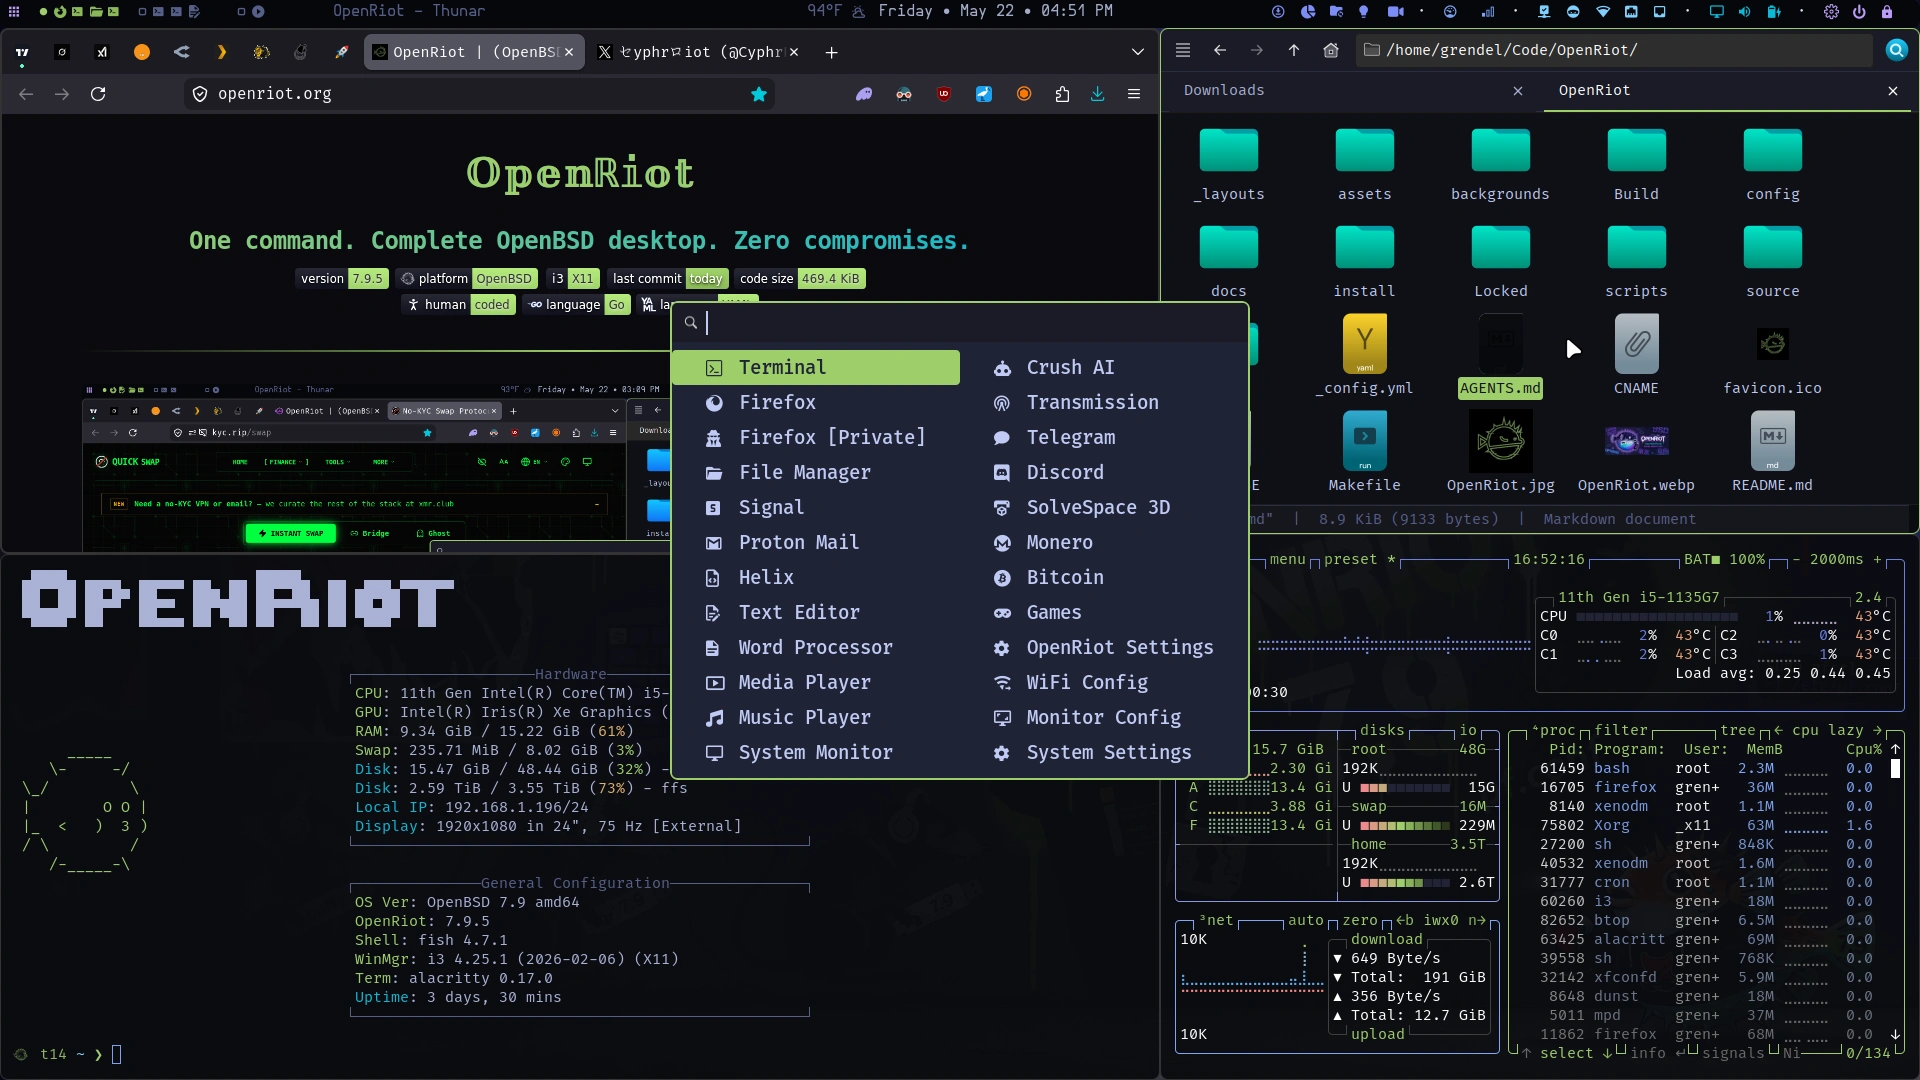
A ridiculously polished i3 desktop for OpenBSD 7.9 with fish, Helix, and Polybar — tuned so everything just works. No config drama. No package fights. No Linux copium.
Base OpenBSD 7.9 install → one script → fast, dark, beautiful desktop that respects OpenBSD’s strengths instead of fighting them.
OpenRiot versions track OpenBSD releases directly. OpenBSD 7.9 = OpenRiot 7.9.x.
-
Read the original Post on X
-
Read the Register’s OpenBSD 7.9 article
-
Header art by Hero
Curated to be correct
- 🪟 i3 Tiling — X11-native tiling that actually gets it right.
- ⚡ Robust Binary — Atomic operations, rollbacks, zero dependency hell.
- 🛡️ Privacy — Zero telemetry or tracking. Your machine stays yours.
- 🎨 Aesthetics — Dark themes that work at any hour.
- 💻 Development — Helix and fish upgrades that feel native on OpenBSD.
- 💳 Monero — Private by default with Polybar integration.
- 💎 OpenBSD — The most audited OS on the planet. We amplify it.
⚠️ The Usual Free Software Warning ⚠️
OpenRiot is under active development. It may not work as expected. Some features might be broken. Use at your own risk. Blah blah.
Hardware Diversity: Every system is unique — different network cards, WiFi chipsets, video cards, storage controllers, and countless other components. We’ve done our best to handle every possible configuration, but it’s simply impossible to be completely comprehensive.
Found an issue? Open an issue on GitHub and we’ll work through it together.
System Requirements
| Requirement | Spec | Notes |
|---|---|---|
| Resolution | 1920x1080 minimum | OpenRiot’s User Interface requires this |
| RAM | 2GB+ minimum | 8GB+ Optimal |
| Disk | 25GB+ recommended | 100GB+ Optimal |
📚 Navigate This Guide
- 💎 Donations
- 🚀 Installing OpenRiot
- ⌨️ Master Your OpenRiot Desktop
- 🎮 Games
- Blockchain
- Kate
- 📝 Using Helix (Editor)
- 🔄 System Management
- Disk Manager
- 🔄 Backup & Restore
- 🧰 Advanced Usage
- 🔧 Troubleshooting
- 🦊 Browser & Data Transfer
- 🛡️ Xenocara’s Hardening
Why OpenRiot Chose…
- Why OpenRiot Uses the openriot Binary (No Shell Scripts)
- Why OpenRiot Chose fish + Helix + crush
- Why OpenRiot Chose Its Desktop Stack (i3 + Xenocara)
- Why OpenRiot Chose Polybar
📋 Release Notes
- v7.9.33 — The Flatline Blinks
- v7.9.32 — The Fedorafication Continues
- v7.9.31 — All the Doors are Repainted
- v7.9.30 —
ulimit -dSaves the World - v7.9.29 — Live Long and
ulimit -v - v7.9.28 — Ran in the Streets with Shadows
- v7.9.27 — Dump It Like It’s Hot
- v7.9.26 — Securely Random, Perfectly Aligned
- v7.9.25 — The Binary Ate My Backup Tool
- v7.9.24 — Four Versions in a Trenchcoat
- Older releases →
Previous release notes can be found at GitHub or in the Documents folder.
✅ Supported Systems
Highly Recommended ThinkPad Series
These ThinkPads have excellent OpenBSD support for WiFi, trackpoints, and suspend/resume:
| Model | CPU | WiFi | Notes |
|---|---|---|---|
| T14s Gen 1+ | Intel i5/i7 or AMD Ryzen | ⭐⭐⭐⭐⭐ | Best OpenBSD laptop |
| T490 | Intel i5-8265U | ⭐⭐⭐⭐ | Good experience overall |
| T480 | Intel i5-8350U | ⭐⭐⭐⭐ | Works well, slightly older |
| X1 Carbon Gen 7 | Intel i7-8665U | ⭐⭐⭐⭐ | Premium build, good Linux/OpenBSD support |
| X270 | Intel i5-6300U | ⭐⭐⭐ | Small, portable, older but solid |
-
You can buy a T14 Gen 1 for ~$300 USD at Amazon. You can also buy a T14s Gen 2 for around the same price. Both are rock-solid, tested, and work perfectly out of the box.
-
You can buy a ThinkPad X1 Carbon Gen 8 from Amazon for ~$400 with 16GB RAM and 512GB drive. It’s very well supported by OpenBSD and very lightweight.
Other Well-Supported Laptops
| Model | CPU | WiFi | Notes |
|---|---|---|---|
| Lenovo V14 | Ryzen 5 3500U | ⭐⭐⭐⭐⭐ | Budget option, excellent OpenBSD support |
| Framework Laptop 13 | Intel i5-1240P | ⭐⭐⭐⭐⭐ | Modular, user-repairable, OpenBSD works well |
| Dell XPS 13 9300 | Intel i7-1065G7 | ⭐⭐⭐⭐ | Beautiful screen, good Linux/OpenBSD support |
Avoid or Use Caution
| Model | Reason |
|---|---|
| Any MacBook | Broadcom WiFi requires proprietary firmware; OpenBSD does not support it |
| Lenovo Flex 3 | Very new hardware may not be recognized |
| HP Envy x360 | Some models have unsupported AMD WiFi |
Key Components for OpenBSD
- WiFi: Use Intel
iwmor USB Atheros adapters only. See the full supported list below. - CPU: Intel and AMD Ryzen are both well-supported. ARM support is experimental.
- GPU: Intel integrated graphics are best-supported. AMD Radeon works but with varying feature support. NVIDIA is not supported on OpenBSD.
- Trackpoint: All ThinkPad trackpoints work. Some USB trackpoints may require additional configuration.
✅ Supported Network Hardware
⚠️ OpenBSD is very selective about WiFi adapters. Only use adapters from this list:
Built-in WiFi (PCIe/M.2)
| Adapter | Chip | OpenBSD Driver | Support Level | Buy |
|---|---|---|---|---|
| Intel Wi-Fi 6 AX200 | iwm |
iwm(4) |
⭐⭐⭐⭐⭐ | Check ThinkPad T14s |
| Intel Wi-Fi 6 AX201 | iwm |
iwm(4) |
⭐⭐⭐⭐⭐ | Common in 10th-gen+ ThinkPads |
| Intel Wireless 8265 | iwm |
iwm(4) |
⭐⭐⭐⭐ | Found in T470, X270, others |
| Intel Wireless 8260 | iwm |
iwm(4) |
⭐⭐⭐⭐ | Older but well-supported |
| Intel Wireless 3165 | iwm |
iwm(4) |
⭐⭐⭐ | Older, 802.11ac only |
| Intel Wireless 7265 | iwm |
iwm(4) |
⭐⭐⭐⭐ | Found in T450, X250 |
| Qualcomm Atheros QCA6174 | athn |
athn(4) |
⭐⭐⭐⭐ | Found in some ThinkPads |
| Broadcom BCM4360 | brcm |
brcm(4) |
⚠️ Requires firmware | Avoid if possible |
USB WiFi Adapters (Nano/Compact)
| Adapter | Chip | OpenBSD Driver | Support Level | Buy |
|---|---|---|---|---|
| ASUS USB-AC56 | urtwn |
urtwn(4) |
⭐⭐⭐⭐⭐ | Check price |
| TP-Link Archer T3U | urtwn |
urtwn(4) |
⭐⭐⭐⭐ | Budget option |
| Netgear A6200 | urtwn |
urtwn(4) |
⭐⭐⭐ | Older but supported |
| TP-Link TL-WN722N v3 | urtwn |
urtwn(4) |
⭐⭐⭐⭐ | Very cheap, 802.11n only |
| Alfa AWUS036NHA | athn |
athn(4) |
⭐⭐⭐⭐⭐ | High gain, excellent range, 802.11n |
| Alfa AWUS036ACS | rtl88au |
rsu(4) |
⭐⭐⭐⭐ | Long range, 802.11ac |
NOT Supported (Do Not Buy)
| Adapter | Chip | Reason |
|---|---|---|
| Any Broadcom (e.g., BCM94352Z) | brcmfmac |
Requires proprietary firmware; OpenBSD will not load it |
| Realtek 8812AU/8821AU | rtl8812au |
No OpenBSD driver exists |
| MediaTek MT7921 | mt7921u |
No OpenBSD driver |
| Any 802.11ax (WiFi 6E/7) USB | various | Generally not supported |
⚠️ UEFI/BIOS Settings
Before installing OpenBSD (and therefore OpenRiot), you need to make some BIOS/UEFI adjustments to ensure everything works correctly. Most hardware ships with settings that assume you’re running Windows or macOS — we need to fix that.
If you run into trouble, there’s a video on installing OpenBSD that walks through much of what you need to know.
How to Enter BIOS
- ThinkPads: Press
Enterduring boot to interrupt, thenF1for BIOS. Or pressF12for boot menu and look for BIOS setup. - Other brands: Press
F2,F10, orDelduring boot.
Recommended UEFI/BIOS Settings
- Disable Secure Boot — OpenBSD does not support Secure Boot. You must disable it in BIOS.
- Navigate to
Security→Secure Boot→ Set to Disabled - If there’s a “Microsoft Windows” Secure Boot key, you may need to clear it first
- Navigate to
- Set Boot Mode to “UEFI Only” (or “UEFI and Legacy” if available)
- Navigate to
Boot→Boot Mode→ Select UEFI Only (or UEFI + Legacy) - Avoid “Legacy Only” as OpenBSD prefers UEFI
- Navigate to
- Disable Fast Boot / Fast Startup (if available)
-
This can prevent the boot menu from appearing
-
Navigate to
Power→Fast Startup→ Disabled
-
- Enable “USB Boot” (if available)
- Ensures you can boot from USB drives
- Set boot order to prioritize your USB/ISO device
- Navigate to
Boot→Boot Order→ Place your USB drive first
- Navigate to
- Disable Intel VTD (if you encounter i3/X11 issues)
- Navigate to
Security→Intel VT-dorAMD-Vi→ Disabled - Note: This is only needed in rare cases. Try with it enabled first.
- Navigate to
- Set SATA mode to AHCI (not RAID/Intel RST)
- Navigate to
Storage→SATA Mode→ AHCI - RAID mode can cause OpenBSD to not see the disk
- Navigate to
Pre-Installation Checklist
Before booting the OpenBSD ISO:
- USB drive created with OpenBSD ISO (see above)
- Secure Boot disabled in BIOS
- Boot mode set to UEFI
- USB boot enabled
- SATA mode set to AHCI
- BIOS defaults loaded if you made many changes
- CMOS battery healthy (or laptop plugged in) to preserve settings
Why This Matters for OpenBSD
OpenBSD is more conservative than Linux about hardware defaults. It assumes a clean, standards-compliant UEFI environment. Secure Boot, fast boot, and RAID modes are all Microsoft/Intel/AMD-specific optimizations that OpenBSD doesn’t use — they can cause boot failures, disk recognition issues, or prevent i3 from starting.
🔊 Bluetooth
⚠️ OpenBSD has NO native Bluetooth support. The Bluetooth stack was removed years ago and has not been reinstated.
This means:
- No Bluetooth audio (no AirPods, no Bluetooth headphones, no Bluetooth speakers)
- No Bluetooth mice or keyboards (pairing will fail)
- No file transfer (no OBEX)
What Doesn’t Work
- AirPods, Beats, or any Bluetooth audio device
- Bluetooth mice or keyboards (Logitech MX Master, Apple Magic Mouse, etc.)
- Any device that requires Bluetooth pairing
Bluetooth Audio Workaround
The best workaround is to use USB audio or a USB Bluetooth adapter that presents itself as a wired audio device. Options:
- USB Speaker — Just plug and play. No Bluetooth needed.
- USB DAC + Wired Headphones — Better audio quality anyway.
- AirPods via USB-C cable — Use them as wired earbuds (yes, really)
- USB Bluetooth adapter that works as audio — Some adapters present A2DP profile as USB audio (very rare)
Bluetooth Mouse/Keyboard Workaround
- Use a USB mouse — Any basic USB mouse works perfectly
- Use a 2.4GHz wireless mouse — Logitech Unifying Receiver (uses a separate USB dongle, not Bluetooth)
- Use a wired mouse or keyboard — Works 100% of the time
Recommended Input Setup
For the best OpenBSD + i3 experience:
| Device | Recommendation |
|---|---|
| Mouse | Basic USB mouse (2.4GHz wireless with dongle also works) |
| Keyboard | Any USB keyboard; ThinkPad keyboards work perfectly |
| TrackPoint | Works natively on ThinkPads — no configuration needed |
| Graphics | Intel iGPU preferred; AMD Radeon works; NVIDIA not supported |
🚀 Installing OpenRiot
There are two ways to install OpenRiot on a fresh machine. Method 1 is strongly recommended for most users because it uses the official, up-to-date OpenBSD installer and fetches the latest packages during setup. This ensures you get current firmware, security patches, and a fully tested base. Method 2 provides an offline experience by bundling everything into a custom image, which is ideal for air-gapped environments, slow/unreliable internet, or initial testing without network exposure — but it comes with caveats (see below).
Method 1 (Recommended): Install standard OpenBSD from install79.img, then run setup.sh.
Method 2 (Offline): Experimental! Flash openriot.img which bundles packages. Base install happens offline, then run setup.sh after first login.
Typical time: 20 minutes (Method 1 with fast internet); 5 minutes (Method 2, no downloads during install).
Choosing Between Methods – Nuances and Implications:
-
Method 1 (Online): Best for reliability and currency. Requires a working network connection during the
setup.shphase (packages, firmware, git clone of configs). Thesetup.shscript (a robust Go binary) handles atomic installation, config deployment, and has built-in rollback awareness. Internet also allowsfw_updateand mirror selection for fastest mirrors. -
Method 2 (Offline): Useful when you cannot or do not want to connect during base install (e.g., privacy-conscious first boot, travel, or metered connections). The image includes a
site79.tgzset that pre-installs many packages viainstall.site. However, bundled package versions may lag behind the absolute latest snapshots, and some edge-case hardware/firmware detection or post-install tweaks might differ. It is currently marked as not fully stable — use primarily for evaluation or when Method 1 is impractical. Always verify checksums and consider it experimental until the note is removed in a future release. -
Edge cases: If your hardware has very new components or you need specific recent fixes, Method 1 is safer. For reproducible/offline deploys (e.g., multiple machines), Method 2 shines once stabilized. Both paths converge on the same polished desktop after
setup.sh.
1. Download
Method 1: OpenBSD Installer (Recommended)
Download the official OpenBSD installer:
Method 2: OpenRiot Image (Offline)
Important clarification on stability: As of the current release, the openriot.img (Method 2) has not undergone the same breadth of automated + manual testing as the standard path. Potential areas of variance include:
- Completeness of pre-bundled packages or firmware for less common hardware.
- Exact behavior of
install.sitehooks on certain disk controllers or WiFi chipsets. - Minor differences in default configurations or post-boot service states.
- Risk of version skew between the image’s bundled sets and the live
setup.shexpectations.
Recommendation: Prefer Method 1 unless you have a specific need for offline installation. If using Method 2, boot it in a test VM or spare hardware first, monitor the setup log (~/.cache/openriot/setup.log), and report any issues. We are actively hardening the offline image and expect to promote it to stable in a near-term release. Download at your own risk and always cross-check the GitHub release assets and checksums.
Download the OpenRiot Install Image ~1.8G
2. Flash to USB
Linux: dd if=install79.img of=/dev/sdX bs=4M status=progress oflag=sync
OpenBSD: doas dd if=install79.img of=/dev/rsdXc bs=1M && sync
(Replace sdX/rsdXc with your USB device. Find with dmesg | grep ^sd.)
Method 1: Standard OpenBSD Install (Recommended)
- Disable Secure Boot, set USB first in boot order
- At
boot>prompt, typeIand press Enter - Follow the interactive prompts:
| Prompt | Action |
|---|---|
| Keyboard layout | Press Enter |
| System hostname | Type openriot → Enter |
| Network interface | Type done → Enter |
| IPv4 autoconf | Press Enter |
| IPv6 | Type none → Enter |
| Root password | Type and confirm password |
| Start sshd | Press Enter |
| X Window System | Type no → Enter |
| Setup a user | Type username → Enter, then set password |
| Which disk | Type sd1 (USB boot: sd0=USB, sd1=target) |
| Use (W)hole disk MBR | ⚠️ Choose G for GPT (MBR won’t boot) |
| Encrypt disk | Type p or no |
| Partition layout | Type c for custom |
| Label editor | z → a / → size → a swap → a /home → w → q |
| Location of sets | Type disk → Select your USB device |
| Set name(s) | Press * and then Enter (all sets) |
| SHA256 verification | Type yes → Enter |
Partition layout (choose c):
/       50G (or more)
swap    2G (or more)
/home   * (rest of disk)
Why this layout and sizing guidance (with nuances):
- / (root): 50GB+ gives ample room for
/usr/local, packages, logs, and the Go-builtopenriotbinary + its dependencies without constant cleanup. OpenBSD keeps a relatively lean base, but development tools, Helix, and GUI apps add up. You can grow it later withgrowfsif needed. - swap: 2GB+ is a safe minimum for modern RAM sizes (suspend-to-disk, large compiles, or memory pressure). Rule of thumb: at least 1–2× RAM for heavy use, or match RAM for reliable hibernation-like behavior. On SSDs, swap is fast; on HDDs, keep it reasonable.
- /home: Takes the rest. Keeps user data, configs (
~/.config), Downloads, Music, Videos, and ProtonSync separate from system. This simplifies backups, reinstalls, or future full-disk encryption experiments. It also aligns with OpenBSD’s clean separation philosophy. - Encryption option (
p): Full-disk encryption (using OpenBSD’ssoftraid+bioctl) is supported and recommended for laptops or sensitive data. It adds a passphrase prompt at boot. Tradeoff: slightly more complex recovery, minor performance hit on very old hardware, but excellent security. Test in a VM first if new to it. Many OpenRiot users enable it. - Edge cases & implications: Very small disks (<40GB) may need trimming (e.g., 30G root). If you plan heavy Docker-like workloads (rare on OpenBSD) or large builds, give root more space. Always leave headroom; OpenBSD values stability over filling disks. GPT (
G) is mandatory for modern UEFI boots — MBR will fail silently or boot incorrectly.
Reboot and Configure
reboot
Log in as root first:
# Configure doas (passwordless sudo for OpenBSD)
tee /etc/doas.conf << 'EOF'
permit nopass $USER
permit nopass :wheel
EOF
doas configuration notes and security considerations:
nopassremoves the password prompt for your user and thewheelgroup. This is the standard OpenRiot setup for a smooth desktop workflow (one-command updates, polybar actions, etc.).- Tradeoffs & implications: Huge usability win for a daily driver desktop — no constant password typing for common privileged tasks. However, it reduces the “something you know” factor. On a multi-user or high-security machine, consider removing
nopassor scoping it more tightly (e.g., only specific commands). The config is simple by design; you can edit/etc/doas.conflater anddoas -C /etc/doas.confto validate. - Best practice: Use a strong user password at install time. Enable full-disk encryption if the machine is portable. The
setup.shandopenriotbinary run many commands viadoasinternally where needed. - After this, log out of root and log in as your normal user to continue.
Now log in as your user and run:
doas pkg_add curl
curl -fsSL https://openriot.org/setup.sh | sh
The desktop starts automatically after setup completes and you reboot.
Method 2: OpenRiot Installer Image (Offline)
- Flash
openriot.imgto USB (same flash command as above) - Boot from USB, type
Iatboot>prompt - Answer the standard OpenBSD prompts (same table as Method 1)
- When prompted for Which sets?, type
*— this discoverssite79.tgz - Reboot when finished
- Log in as your user and run:
curl -fsSL https://openriot.org/setup.sh | sh
Packages and firmware install automatically from the USB via install.site.
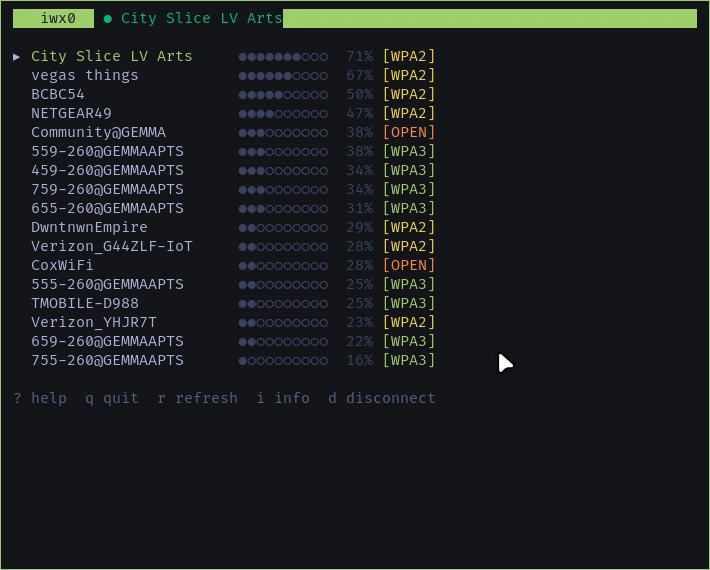
WiFi Setup
If you need WiFi during install (before the desktop is ready), configure it manually via the classic OpenBSD hostname.if(5) method:
doas vi /etc/hostname.iwx0
# Add: join "MyNetwork" wpakey "Password"
# Add: autoconf
doas sh /etc/netstart iwx0
Post-connection verification (recommended):
ifconfig iwx0          # Check status, IP, signal
ping -c 3 cdn.openbsd.org   # Or 1.1.1.1
Or use the built-in WiFi manager after first boot (much easier for daily use and scanning):
- Rofi:
Super + D→ Select WiFi (graphical picker) - Terminal:
openriot --nmtui(or the underlying tool)
Important nuances & edge cases:
-
MAC randomization (Stealth mode): If you enable
openriot --random-mac enablelater, it will spoof the MAC on each connection. This is excellent for privacy on public networks but can interfere with captive portals, enterprise 802.1X, or networks that whitelist specific MACs. In those cases, temporarily disable withopenriot --random-mac disableor use the polybar stealth module. -
Captive portals / hotel / airport WiFi: The CLI
ifconfigmethod ornmtuiusually works, but you may need to open a browser manually (firefox) after connecting to complete the login page. Some portals are tricky with randomized MACs — disable stealth temporarily. -
Driver/firmware: Most Intel
iwm(4)adapters work out of the box afterfw_update. If your adapter needs firmware, the setup script or manualfw_updatehandles it. Checkdmesg | grep -i iwmorifconfigoutput. -
USB adapters: Same
hostname.ifsyntax works (e.g.,urtwn0,athn0). See the supported hardware table above. -
No internet after connect? Double-check
wpakeyquoting/spelling, runifconfig iwx0 down; ifconfig iwx0 up, or restart withsh /etc/netstart iwx0. The polybar network module will show signal strength and internet status once the desktop is up.
This hybrid approach (manual during install + polished rofi/polybar tools after) keeps things “correct” for OpenBSD while making daily life pleasant.
⌨️ Master Your OpenRiot Desktop

We use Helix instead of vi or vim. The essential bindings are documented in 📝 Using Helix. A full OpenRiot keybindings reference is coming.
Essential Keybindings
| Key | Action |
|---|---|
Super + Return |
Open terminal |
Super + Shift + Return |
Floating terminal |
Super + D |
Open app launcher (rofi) |
Super + Q |
Close window |
Super + E |
Proton Mail (web app) |
Super + L |
Lock screen |
Super + Z |
Toggle floating |
Super + H |
Split horizontal |
Super + P |
Toggle layout |
Super + Shift + F |
Toggle fullscreen |
Super + 1-4 |
Switch workspace |
Super + Shift + 1-4 |
Move window to workspace |
Super + Shift + E |
Exit i3 |
Super + F |
File Manager (Thunar) |
Super + B |
Browser (Firefox) |
Super + O |
Gnome Text Editor |
Super + C |
Open Crush AI |
Super + T |
Open system monitor (btop) |
Super + G |
Telegram |
Super + S |
Signal (gurk CLI) |
Super + M |
Google Messages |
Super + X |
X (Twitter) |
Super + Shift + K |
Music Player (rmpc) |
Super + W |
Next wallpaper |
Super + Shift + W |
Previous wallpaper |
Super + Shift + S |
Screenshot (region) |
Super + Shift + V |
Clipboard manager |
Super + Shift + G |
Open settings menu |
Super + Shift + J |
Open games menu |
Super + Shift + H |
OpenRiot Help (website) |
Super + Escape |
Power menu |
Super + = |
Calculator (rofi) |
Super + [ / ] |
Resize: shrink/grow width |
Super + Shift + [ / ] |
Resize: shrink/grow height |
Super + - |
Show scratchpad |
Super + Shift + - |
Move to scratchpad |
Super + Shift + R |
Reload i3 config |
Super + Shift + C |
Restart i3 |
Super + Tab |
Focus next window |
Super + Shift + Tab |
Focus previous window |
Super + Arrow keys |
Focus window direction |
Super + Shift + Arrow |
Move window to direction |
Super + button4/5 |
Scroll workspaces |
Print |
Screenshot (fullscreen + clipboard) |
Shift + Print |
Screenshot (fullscreen + clipboard) |
Ctrl + Print |
Screenshot (fullscreen + clipboard) |
Super + Shift + N |
Toggle screen recording |
Super + Shift + X |
Compose tweet |
Super + Shift + space |
Refresh polybar |
Media Keys
| Key | Action |
|---|---|
Volume +/- |
Adjust volume |
Mute |
Toggle mute |
Mic Mute |
Toggle microphone mute |
Brightness +/- |
Adjust screen brightness |
System Hotkeys
Control polybar modules and system features directly from the keyboard.
| Key | Action |
|---|---|
Super + N |
Toggle night light (redshift) |
Super + V |
Toggle audio mute |
Super + U |
Check for OpenRiot updates |
Super + Y |
Show crypto prices notification |
Super + A |
Show battery status notification |
Super + I |
Toggle WireGuard VPN |
Super + J |
Sync Proton Drive |
Super + Shift + P |
Show CPU notification |
Super + Shift + M |
Show memory notification |
Super + Shift + U |
Show WiFi info |
Super + Shift + G |
Open settings menu |
Super + Shift + J |
Open games menu |
App Launcher
Press Super + D to open the app launcher. Only curated apps are shown — no system clutter.
| App | Icon | Description |
|---|---|---|
| Terminal | | Alacritty terminal |
| File Manager | | Thunar file browser |
| Firefox | | Web browser |
| Firefox (Private) | | Private browsing |
| Select WiFi | | Wi-Fi network manager |
| Monitor Resolution | | Display resolution picker |
| Text Editor | | GNOME text editor |
| Helix | | Text editor |
| Word Processor | | LibreOffice Writer |
| Media Player | | mpv video player |
| Music Player | | rmpc music player (MPD) |
| Proton Mail | | Email (web app) |
| Signal | | Signal messenger (gurk) |
| System Monitor | | btop resource monitor |
| Telegram | | Messaging app |
| Discord | | Discord (abaddon client) |
| Blockchain | | Crypto tools sub-menu |
| Transmission | | BitTorrent client |
| Crush AI | | AI CLI assistant |
| Settings | | XFCE settings manager |
| Benchmark | | OpenRiot benchmark |
| SolveSpace 3D | | 3D CAD modeler |
| Games | | Games sub-menu |
Top Menu (Polybar)
Quick Reference: Polybar is your status bar. Click on modules for more. For full configuration details, per-module states, scroll actions, and customization reference, see the Polybar Modules section in Advanced Usage.
| Module | Click Action |
|---|---|
| Launcher | Opens app launcher |
| Workspaces 1-3 | Click to switch workspace |
| Window Title | Shows focused window name |
| Date | Shows date/time |
| weather | Shows current temp + conditions (OpenWeatherMap) |
| No. | Module | Icon | Meaning |
|---|---|---|---|
| 1 | crypto | | Crypto prices (hidden when no config) |
| 2 | proton-drive | / | Synced / Syncing (auto-hides when not configured) |
| 3 | transmission | | Running (auto-hides when stopped) |
| 4 | night-light | / | Night light ON / OFF |
| 5 | screenrec | / | Idle / Recording |
| 6 | cpu | →→→ | CPU load tier |
| 7 | memory | →→→ | RAM usage tier |
| 8 | wireguard | | VPN connected (auto-hides when not configured or disconnected) |
| 9 | stealth | / | MAC randomization ON / OFF |
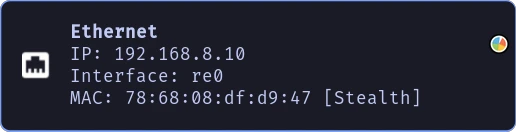
| 10 | network-wifi | →→→→ / | Signal bars / No internet |
| 11 | network-eth | / (empty) | Connected / Not connected |
| 12 | openriot-update | / / ? | Update available / Up to date / Unknown |
| 13 | settings | | Settings menu |
| 14 | hdmi | / / | Both / HDMI only / Laptop only |
| 15 | volume | //// | Muted / Very low / Low / Medium / High |
| 16 | battery | → / | Level / Full+charging |
| 17 | power | ⏻ | Power menu |
| 18 | lock | | Lock screen |
Separator: · — Visual divider inserted between functional module groups (e.g., between screenrec and cpu, memory and stealth, etc.).
Workspace Bar: Shows all 3 workspaces with indicators and app icons.
focused workspaceurgent workspaceunfocused with windowsempty workspace- Icons show running apps:
Alacritty,Firefox,Thunar, etc.
🎮 Games
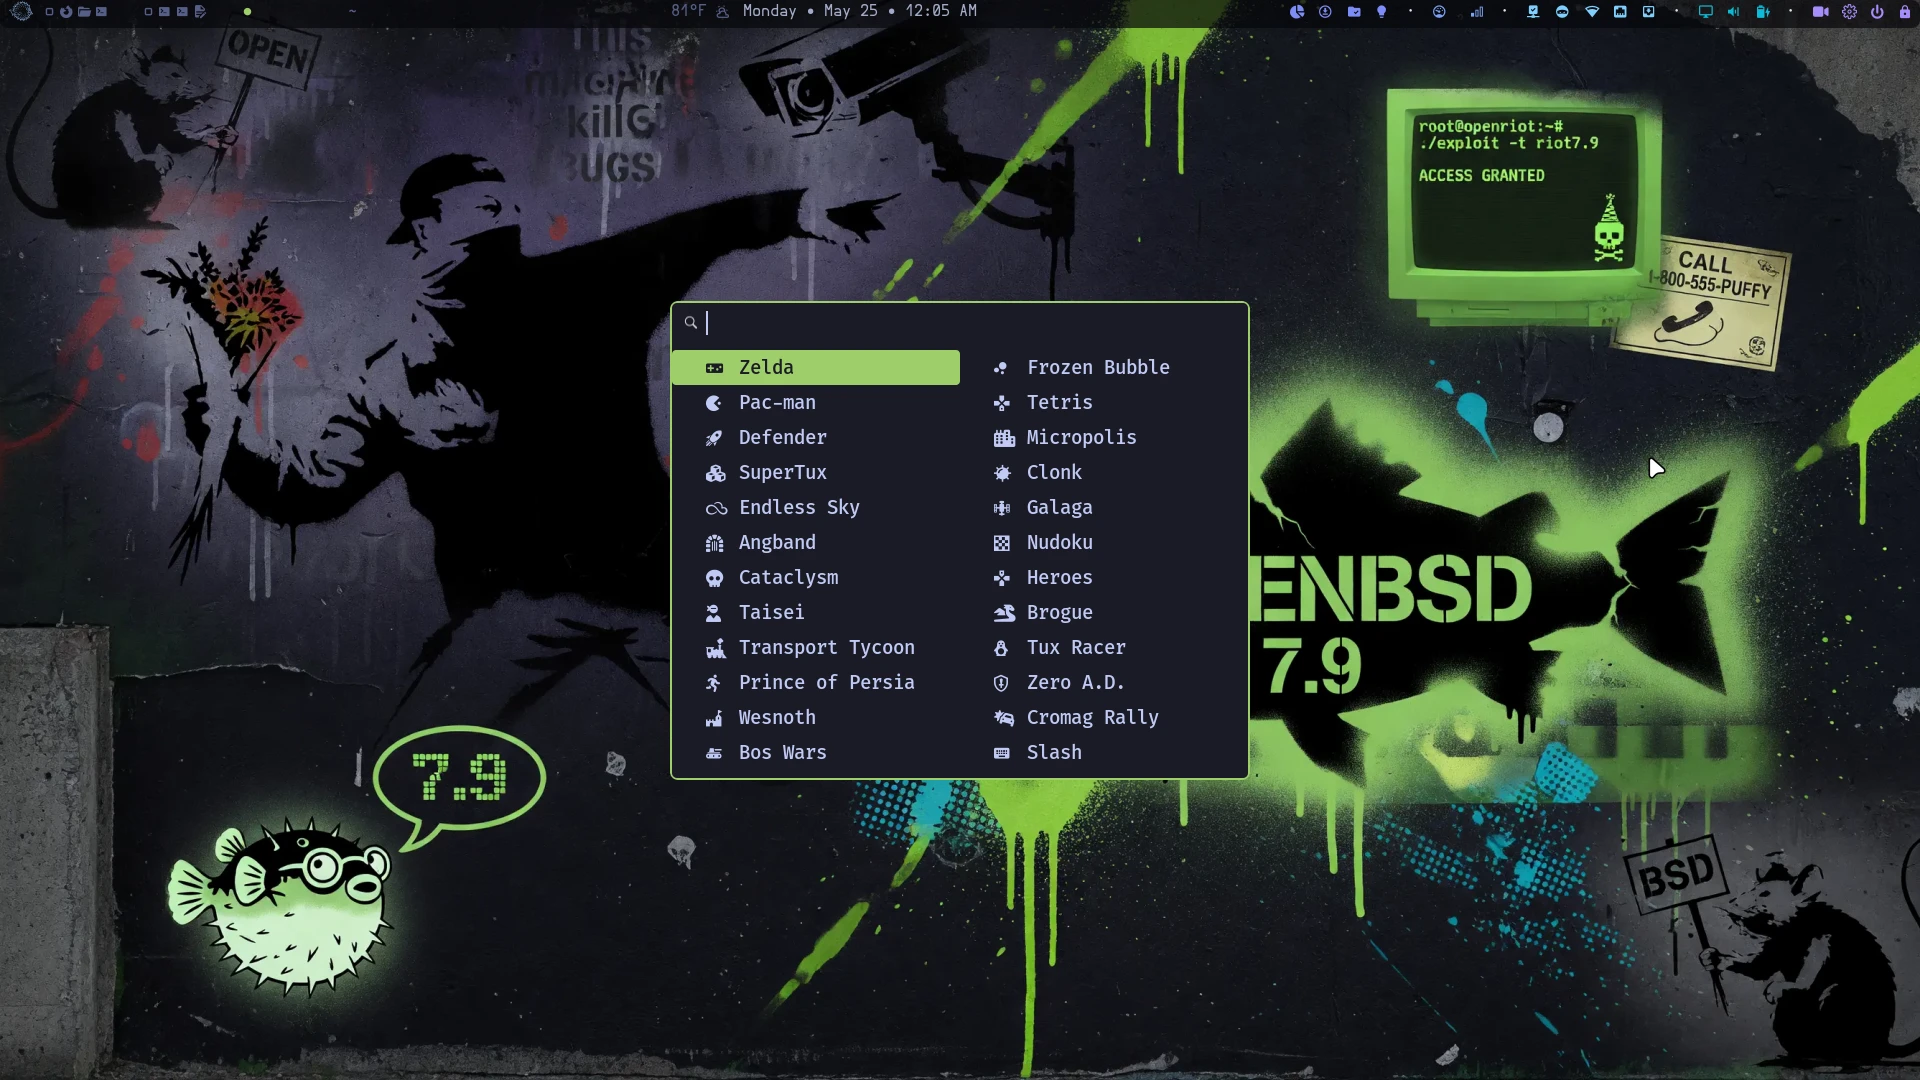
Games are optional — the installer asks whether to include them during setup.
Press Super + Shift + J (or select Games from the app launcher) to open the games menu:
Blockchain
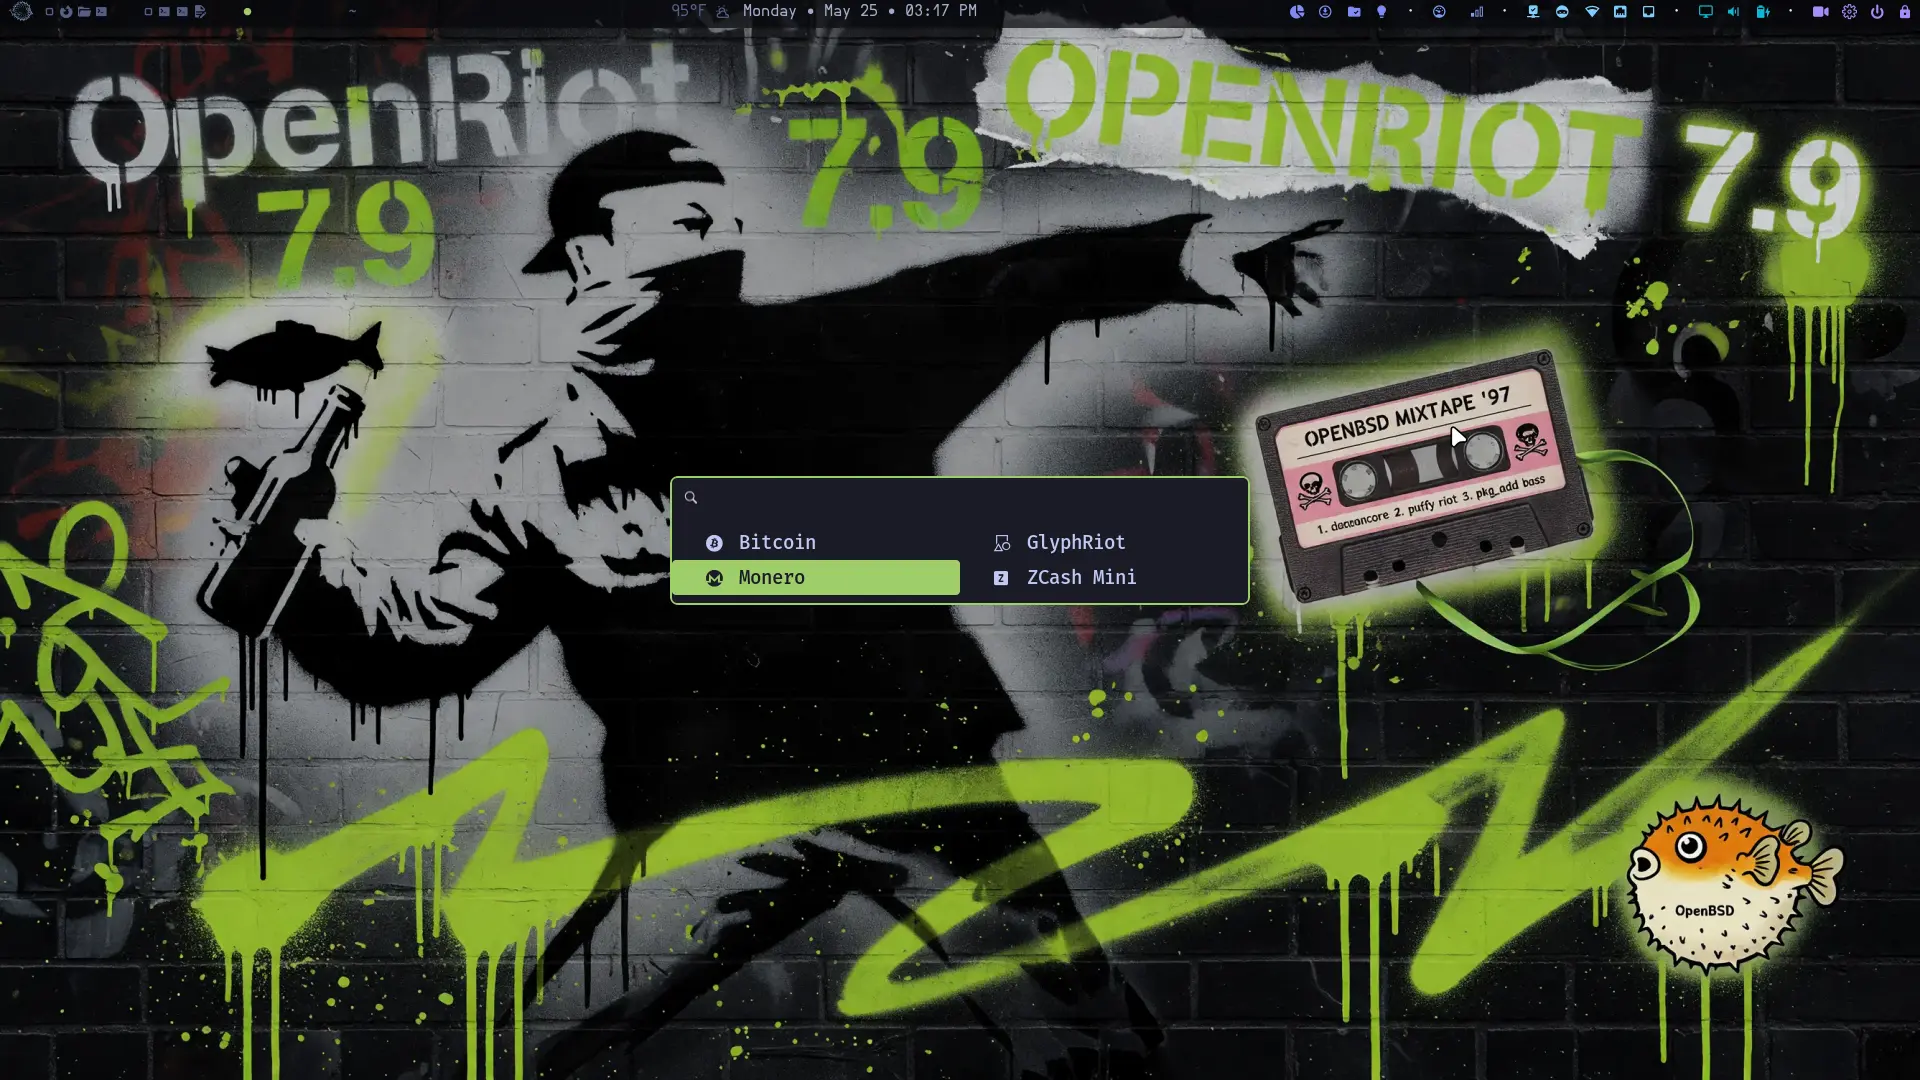
Press Super + D and select Blockchain to open the crypto tools menu:
| App | Icon | Description |
|---|---|---|
| Bitcoin | | Bitcoin Core GUI wallet |
| Monero | | Monero GUI wallet |
| GlyphRiot | | Password manager (floating terminal) |
| ZCash Mini | | ZCash address generator (floating terminal) |
GlyphRiot and ZCash Mini launch in floating terminals with a “Press Enter to close…” prompt so you can read the output before the window closes.
🖊️ Kate
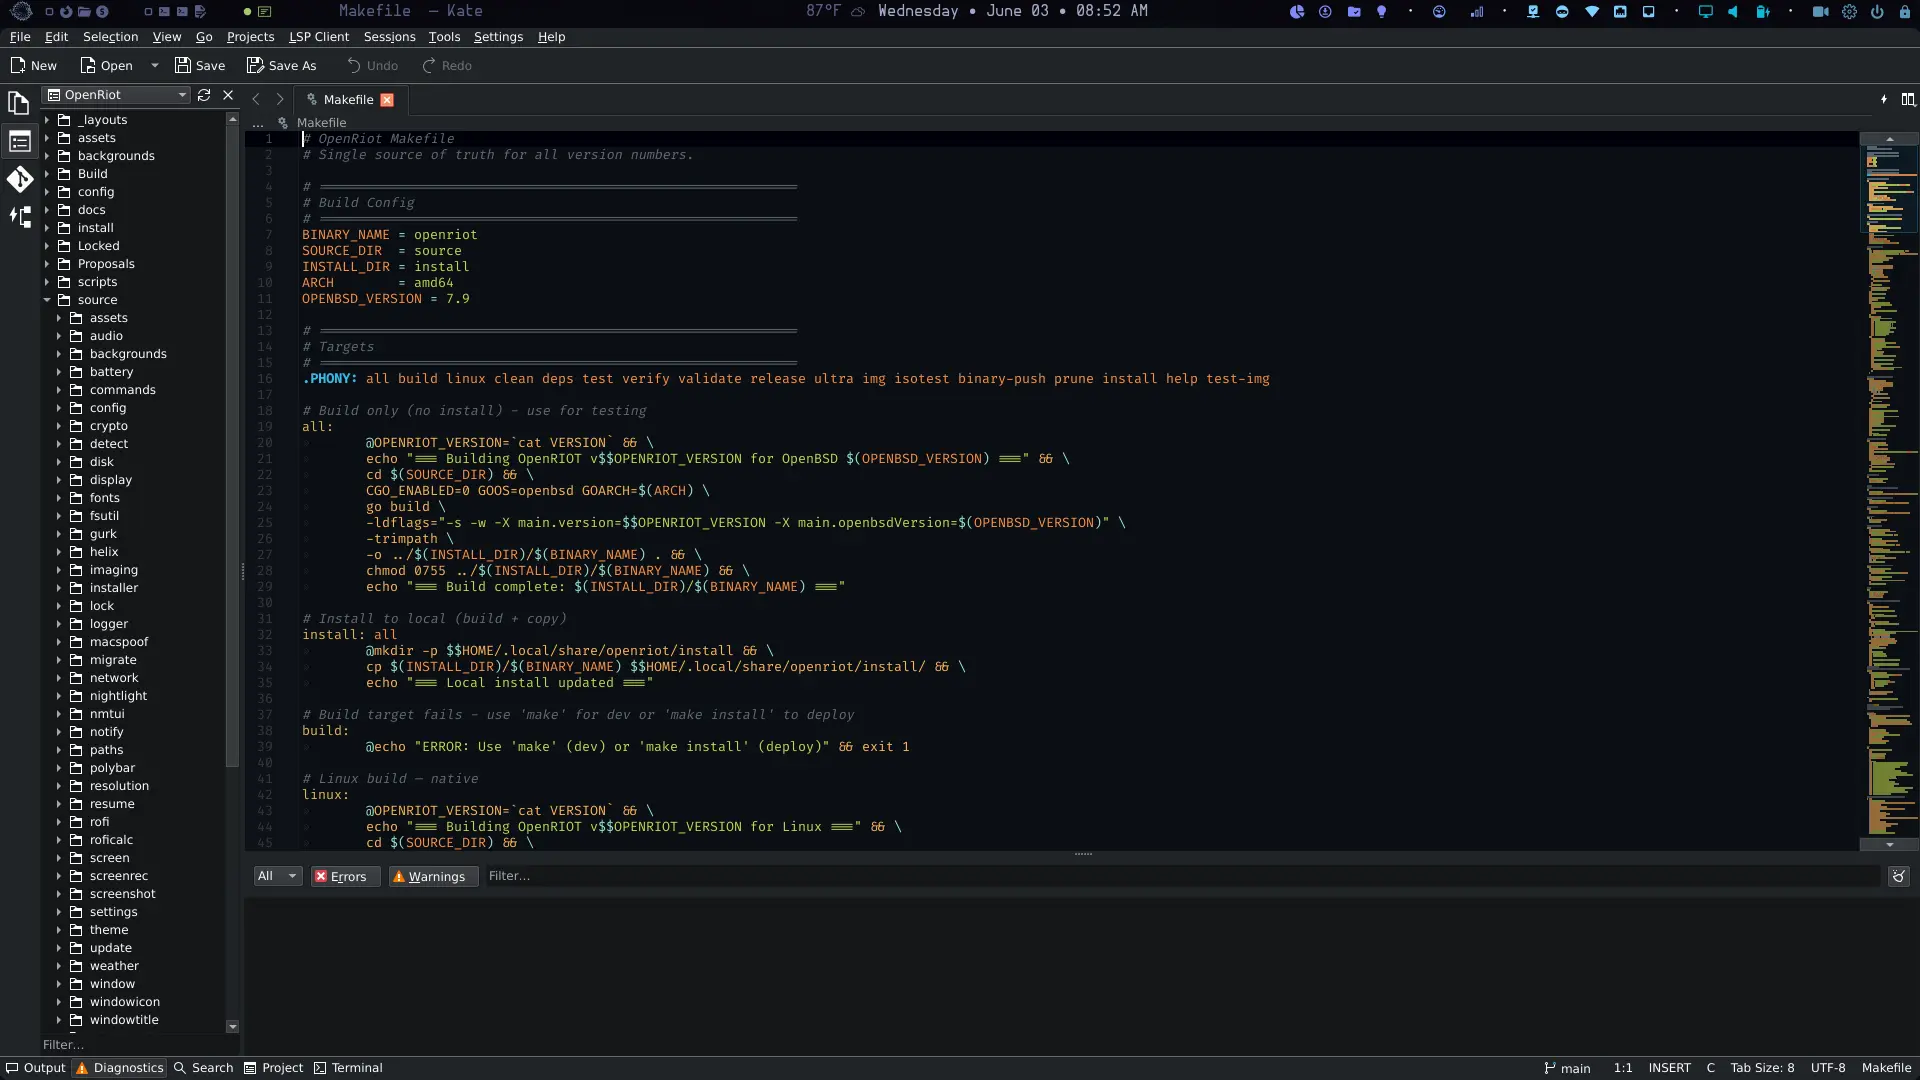
Kate is a KDE-based code editor (~300MB deps) shipped with OpenRiot as an optional install. It comes pre-configured with the Ayu Dark editor theme, FiraCode Nerd Font, and BreezeDark UI color scheme — matching the rest of the desktop aesthetic out of the box.
The installer prompts whether to include it. Skip if you’re happy with Helix; Kate is there for those who want a full GUI IDE.
Shell Aliases & Quick Reference
Fish comes pre-configured with useful aliases:
| Alias | Command | Description |
|---|---|---|
ls |
lsd |
Default listing with icons |
ll |
lsd -l |
Long listing with icons |
la |
lsd -la |
Show hidden files |
vi |
hx |
Open Helix editor |
vim |
hx |
Open Helix editor |
helix |
hx |
Open Helix editor |
signal |
~/.local/share/openriot/config/bin/gurk |
Signal messenger (gurk) |
more |
more -e |
Fixed more pager |
dum |
du -sm * | sort -nr | head -10 |
Top 10 largest items by size |
File Manager
OpenRiot uses Thunar (xfce file manager) as the primary file manager.
Password Management with Glyphriot
OpenRiot includes Glyphriot, a secure password manager that uses a memorable seed phrase and optional glyph to derive your master password. Run with:
glyphriot --prompt
This prompts for your seed and optional glyph, then derives the master password using Argon2id.
Key features:
- Seed + glyph → master password (never stored)
- Supports multiple services
- Encrypted storage with age
- Master password derived on-demand
Security notes:
- Your seed is never stored — only the derived hash
- Use a strong, unique seed you can remember
- Add a glyph for extra security (optional but recommended)
🦊 Browser & Data Transfer
OpenBSD has no Brave browser. Chromium-based browsers are limited — only Ungoogled Chromium is available, and Firefox is the recommended default.
This means:
- No Brave, no Chrome, no Edge — these Chromium derivatives are not ported
- Firefox is the recommended browser — available as
firefoxpackage - Ungoogled Chromium — available as
ungoogled-chromiumfor those who prefer Chromium
Why Firefox?
| Browser | OpenBSD Support | Notes |
|---|---|---|
| Firefox | ✅ Full | pkg_add firefox |
| Ungoogled Chromium | ✅ Available | pkg_add ungoogled-chromium (not installed by default) |
| Brave/Chrome/Edge | ❌ Not available | Chromium derivatives, no port |
Firefox is open source, actively maintained, privacy-respecting by default, and has excellent OpenBSD support.
Transferring Your Data from Brave
If you’re moving from Arch/Brave to OpenBSD/Firefox, here’s how to migrate your data.
Bookmarks (Easy ✅)
Brave and Firefox both support standard HTML bookmark export/import:
# 1. In Brave
Navigate to brave://bookmarks/ → click ⋮ → Export Bookmarks

# 2. In Firefox
Bookmarks → Show All Bookmarks → Import and Backup → Import → Choose HTML file
Extensions
Unfortunately, extensions must be manually reinstalled in Firefox. There is no bulk export when moving to a different system.
# Visit Firefox Add-ons and reinstall each one:
about:addons
Passwords (Moderate 🔧)
Option 1: CSV Export (Quick)
# In Brave
brave://settings/passwords → Export Passwords → CSV

# In Firefox
about:logins → Import → CSV
⚠️ CSV is unencrypted — only do this on a trusted machine.
Option 2: Just re-login — skip the export entirely for security.
History (Difficult ⚠️)
Firefox and Chromium use incompatible SQLite schemas. Full history transfer requires third-party tools:
# Export Brave history to JSON
pip install browser-history
browser-history --browser brave -f json > brave_history.json

# Import to Firefox (limited tool support)
For most users, accepting the loss of browsing history and starting fresh is the pragmatic choice.
Recommended Workflow
- Export bookmarks from Brave → import to Firefox
- Transfer passwords using CSV or just re-login as needed
- Accept that history won’t transfer cleanly
🔄 System Management
OpenRiot uses pkg_add for package management. Packages are pre-configured in /etc/installurl to use OpenBSD’s official CDN.
Finding Packages
# Search for a package
pkg_info -Q <package-name>

# List all installed packages
pkg_info -m

# Check for updates (OpenBSD doesn't have a rolling update model)
# Fresh install is always the current release
Updating the System
OpenBSD doesn’t use apt update or pacman -Syu. Use pkg_add -u to update packages:
# Update all packages
doas pkg_add -u

# Install a new package
doas pkg_add <package-name>

# Remove a package
doas pkg_delete <package-name>
Updating OpenRiot
OpenRiot upgrades are handled automatically. When a new version is released, Polybar will notify you. Click the update indicator to upgrade.
How Upgrades Work
| Scenario | What Happens |
|---|---|
| Fresh install | Clones repo, installs packages, builds source, deploys configs |
| Version available | Pulls latest from git, re-runs package install, re-deploys configs |
| Same version | Re-deploys configs only (preserves existing settings) |
Upgrade Paths
Automatic (Polybar):
- Polybar shows update indicator when new version available
- Click the indicator → confirmation dialog
- Confirm → upgrade runs in terminal
Manual:
# Same command works for fresh install and upgrade
curl -fsSL https://openriot.org/setup.sh | sh
Install a specific version (tag):
openriot --install v4.5
The script automatically detects:
- No existing install → fresh install
- Older version → upgrade (git pull + re-run)
- Same version → config refresh only
Note: Upgrade also updates OpenBSD packages to the latest stable versions via
pkg_add -u. This applies to both the Polybar upgrade click andcurl -fsSL https://openriot.org/setup.sh | sh.
Migrating from -current to Stable Release
If you installed OpenBSD before the release date, you may be on a
-current snapshot even though the release is now available. OpenRiot can
check if your snapshot is pre-release (safe to migrate) or post-release
(downgrade — not supported).
# Check your migration path
openriot --check-release-path
Decision tree:
| Snapshot Date | Status | Action |
|---|---|---|
| Before 7.9 release (May 6, 2026) | Pre-release | doas sysupgrade -R 7.9, reboot, doas pkg_add -u |
| After 7.9 release (May 6, 2026) | Post-release | Stay on -current with doas sysupgrade, or fresh install |
Already on 7.9 (no -current) |
Stable | doas sysupgrade for errata, doas pkg_add -u for packages |
Why this matters: Post-release snapshots contain changes made after
the release freeze. Those changes are not in the release sets. sysupgrade
-R would replace newer code with older code, creating a mismatch that
OpenBSD does not handle.
💿 Disk Manager ⚠️ Experimental
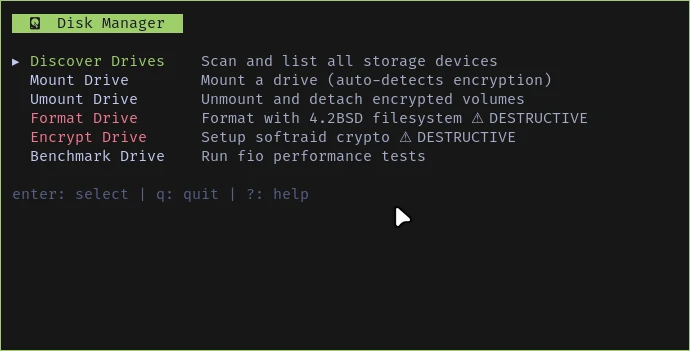
Experimental — likely broken for now. Drive detection works on this system, but mount/umount/format/encrypt/benchmark operations have not been thoroughly tested. Use with caution.
Manage storage devices without leaving the desktop. The Disk Manager TUI provides discover, mount, umount, format, encrypt, and benchmark operations for all drives — including full softraid awareness.
openriot --disk
What It Does
| Action | Description |
|---|---|
| Discover | Scan all sd* / wd* drives with softraid virtual↔physical mapping |
| Mount | Mount selected drive at /mnt/backup (auto-detects softraid crypto) |
| Umount | Unmount and detach encrypted volumes |
| Format | Newfs with 4.2BSD (root drive protected) |
| Encrypt | Setup softraid crypto with passphrase (root drive protected) |
| Benchmark | Run fio IOPS and throughput tests on mounted drives |
- softraid-aware: Virtual devices (
sd0) are mapped back to physical chunks (sd1). Mount status and root detection work across both. - Root protection: Drives marked
[ROOT]cannot be formatted or encrypted. - Drive filtering: Each action only shows eligible drives — no confusion.
🔄 Backup & Restore (Migrate)

Full system backup and selective home directory backup. Embedded in the openriot binary — zero external dependencies.
openriot --backup
Or launch from Utilities submenu in the Rofi launcher.
🧰 Advanced Usage
Environment Variables
OpenRiot sets sensible defaults. Key environment variables:
# Check OpenRiot version
openriot --version

# XDG directories (usually correct by default)
echo $XDG_CONFIG_HOME
echo $XDG_DATA_HOME

# Fish is the default shell
echo $SHELL  # Should show /usr/local/bin/fish
Keybindings Customization
Keybindings are in ~/.config/i3/keybindings.conf.
Edit this file to customize. After saving, press Super + Shift + R to reload i3.
🔒 MAC Address Randomization
OpenRiot includes automatic MAC address randomization for network interfaces. This prevents network operators and observers from tracking your device across different networks by using a randomly generated MAC address on each connection.
How It Works
The system uses ifconfig to spoof MAC addresses on both WiFi and Ethernet interfaces. Each time you connect to a network, a new random MAC is generated, making device fingerprinting significantly more difficult.
Enable/Disable
openriot --random-mac enable    # Enable MAC randomization
openriot --random-mac disable   # Disable (use real MAC)
openriot --random-mac show      # Check current status
Privacy Benefits
- Network Tracking Prevention — Your real MAC is never exposed on public networks
- [Stealth] — The polybar network module shows
[Stealth]when enabled - Automatic — Takes effect on every connection
Compatibility
Works with all supported network interfaces in OpenRiot. Some networks with MAC authentication (captive portals, corporate 802.1X) may require disabling randomization.
Top Menu (Polybar) — Module Reference
Polybar modules are defined in ~/.config/polybar/config.
Each module is a custom script that outputs an icon + status info. Modules update automatically and respond to clicks (and some to scroll). This section provides the complete reference for states, icons, and behaviors.
| Module | Icon | States | Click Action | |
|---|---|---|---|---|
| launcher | | — | Open app launcher (Rofi) | |
| workspaces | 1–3 with app icons | focused / unfocused / urgent | Switch to workspace | |
| window-title | text | — | — | |
| date | | — | Cycle wallpaper | |
| stealth | | ON | Toggle MAC randomization | |
| OFF (hidden) | ||||
| network-wifi | | Excellent (70%+) | WiFi info or reconnect | |
| | Good (50-69%) | |||
| | Fair (30-49%) | |||
| | Poor (20-29%) | |||
| | Very poor / no signal | |||
| | No internet | |||
| network-eth | | Connected | Ethernet info | |
| | No carrier | |||
| wireguard | | Connected | Toggle VPN | |
| | Disconnected | |||
| volume | | High (75%+) | Toggle mute | |
| | Medium (45-75%) | |||
| | Low (10-45%) | |||
| | Very low (1-10%) | |||
| | Muted | |||
| battery | – | Discharging (green>25, orange<25, red<20) | Battery notification | |
| – | Charging (cyan) | |||
| | Full | |||
| crypto | | — | Show price notification (hidden when no config) | |
| night-light | | OFF | Toggle redshift | |
| | ON | |||
| cpu | / / / | 0-25 / 25-50 / 50-90 / 90+% | CPU notification | |
| memory | / / / | 0-25 / 25-50 / 50-75 / 75-100% | Memory notification | |
| nzbget | | Running | Open NZBGet web UI | |
| | Installed, not running | |||
| proton-drive | | Synced | Sync Proton Drive | |
| | Syncing | |||
| transmission | | Running | Show state notification | |
| screenrec | | Idle | Toggle screen recording | |
| | Recording (red) | |||
| openriot-update | | Update available | Check for updates | |
| | Up to date | |||
| ? | Unknown | |||
| settings | | — | Open settings menu | |
| sep | · | — | Visual separator | |
| hdmi | | Both active | Toggle display mode | |
| | HDMI only | |||
| | Laptop only / no external | |||
| weather | varies | — | — | |
| power | ⏻ | — | Open power menu | |
| lock | | — | Lock screen |
🌤 Weather Module (Polybar)
The weather module shows current temperature and conditions in the polybar status bar using OpenWeatherMap API.
Configuration:
- Create weather config at
~/.config/weather.cfg:
location=Las Vegas
units=imperial
api=85a4e3c55b73909f42c6a23ec35b7147
location- City name (required)units-imperial(°F) ormetric(°C)api- OpenWeatherMap API key (required; module hides without one)
- Restart polybar:
Super + Shift + space
If no config exists, the weather module is hidden automatically.
Weather Icons:
| Code | Condition | Icon |
|---|---|---|
| 01x | Clear sky | |
| 02x | Few clouds | |
| 03x/04x | Scattered/broken | |
| 09x | Drizzle | |
| 10x | Rain | |
| 11x | Thunderstorm | |
| 13x | Snow | |
| 50x | Mist/Fog | |
| default | Unknown | |
🔐 Crypto Config
Crypto Prices
- Template:
~/.config/crypto-template.toml(deployed by the installer) - Your config:
~/.config/crypto.toml(you create this; never touched by upgrades) - Shows live prices in the polybar status bar and on-demand notifications
Setup
- Copy the template to your live config:
cp ~/.config/crypto-template.toml ~/.config/crypto.toml
-
Edit
~/.config/crypto.tomland set your coins / holdings. -
The installer never overwrites
crypto.toml. It only refreshes the template. Your live config is safe across upgrades.
How It Works
| Trigger | What Happens |
|---|---|
| Polybar | The crypto module icon () appears automatically when ~/.config/crypto.toml exists. Click it to refresh prices. |
| Keyboard | Press Super + Y for an on-demand price notification via dunst. |
| Terminal | Run openriot --crypto ROWML to print prices to stdout. |
| Refresh | Run openriot --crypto-refresh to clear the cache and fetch fresh data. |
Configuration
# ~/.config/crypto.toml
api_key = ""

[indicators]
rsi_period = 14
oversold = 30
overbought = 70
bb_period = 16
bb_std = 2.0

# Set held=0 to show price only
pairs = [
    { sym = "XMR", coin = "monero",    held = 0, entry = 0 },
    { sym = "ZEC", coin = "zcash",     held = 0, entry = 0 },
    { sym = "BTC", coin = "bitcoin",    held = 0, entry = 0 },
]

[display]
show_totals = false
Understanding the Technical Indicators (optional but powerful):
- RSI (Relative Strength Index): Momentum oscillator (0–100). Default period 14 is standard. Below
oversold(30) suggests potential reversal upward; aboveoverbought(70) suggests potential reversal downward. Useful for timing entries/exits alongside price. - Bollinger Bands (BB): Volatility bands (period + standard deviations). Default 16-period, 2.0 std dev. Price touching upper/lower bands or “squeezes” can signal breakouts or mean-reversion opportunities. The module can surface these in notifications or the polybar hover if extended.
- These are computed client-side from CoinGecko data when you run
--cryptoor click the module. They add analytical depth without external dependencies.
Security & Privacy Notes for api_key:
- Leave empty for basic public CoinGecko API usage (rate-limited but sufficient for personal monitoring).
- If you add a CoinGecko Pro or other API key, keep
crypto.tomlpermissions tight (chmod 600 ~/.config/crypto.toml). The key is only used locally by theopenriotbinary and polybar scripts — never sent to any OpenRiot servers. - Holdings (
held+entryprice) are stored in plain TOML for convenience. If you track significant amounts, consider the privacy implications or use the Monero-focused workflow instead.
Quick rules:
- Add coin:
{ sym = "SYM", coin = "coin-gecko-id", held = 0, entry = 0 } - Show P/L: set
held > 0ANDentry > 0 - Show totals:
show_totals = true
📝 Using Helix — The Default Editor
OpenRiot ships with Helix as the default terminal editor instead of Neovim.
Helix is a modern, fast, and highly polished modal text editor written in Rust. It was chosen for OpenRiot because it perfectly aligns with the project’s core philosophy: simplicity, correctness, excellent defaults, and minimal maintenance overhead.
Why Helix Was Chosen Over Neovim
- Sane defaults out of the box — Built-in LSP support, Tree-sitter syntax highlighting, multi-cursor editing, fuzzy finding, and diagnostics work immediately with zero configuration.
- Minimal configuration — A single, readable
config.tomlfile (usually under 100 lines) replaces hundreds of lines of Lua plugins and init scripts. - Performance — Extremely fast startup time and low memory usage, which feels especially good on OpenBSD.
- Simpler maintenance — Much easier to include and keep consistent across OpenRiot installs and future OpenBSD releases.
- Modern editing model — Selection-first workflow (select then act) is consistent and reduces cognitive load once learned.
- Better security & auditability — Written in Rust with memory safety, aligning with OpenBSD’s values.
Helix gives you a powerful, modern editing experience while staying lightweight and “correct” — exactly what OpenRiot aims for.
Getting Started with Helix
Launch Helix with:
Super + O— Open GNOME Text Editor- Run
hxin any terminal to open Helix
Helix starts in Normal mode by default. Here are the most important commands to get you productive quickly:
Basic Movement & Modes
| Key | Action |
|---|---|
i |
Enter Insert mode (type normally) |
Escape |
Return to Normal mode |
h j k l |
Move left / down / up / right |
w / b / e |
Jump word forward / backward / to end |
gg / G |
Go to top / bottom of file |
0 / $ |
Go to start / end of line |
Editing
| Key | Action |
|---|---|
x |
Select current line |
y |
Yank (copy) selection |
p / P |
Paste after / before cursor |
d |
Delete selection |
c |
Change (delete + enter Insert mode) |
> / < |
Indent / unindent selection |
u / U |
Undo / Redo |
Advanced & Useful
| Key | Action |
|---|---|
Space + f |
Open file picker (fuzzy finder) |
Space + b |
Switch between open buffers |
Space + s |
Symbol picker (functions, variables, etc.) |
/ |
Search forward |
: |
Command mode (:w, :q, :wq, etc.) |
gd |
Go to definition (via LSP) |
Ctrl+w v / s |
Split window vertically / horizontally |
Vim to Helix Quick Reference
If you know Vim/Neovim, here’s how the same tasks work in Helix:
| Task | Vim/Neovim | Helix Equivalent | Notes / Nuances in Helix |
|---|---|---|---|
| Go to top of document | gg |
gg |
Same as Vim. Also works with a count (e.g., 5gg for line 5). |
| Go to bottom of document | G |
G |
G goes to bottom of document (OpenRiot remaps this). |
| Delete character | x |
x |
Selects entire line in Helix. Use dl to delete line, or d after selection. |
| Delete line | dd |
dl |
Use dl (delete line under cursor). |
| Go to end of line | $ |
gl |
gl = goto line end. Very common. |
| Go to start of line | 0 or ^ |
gh |
gh = goto home (start of line). Use gs if you want the first non-whitespace character (like Vim’s ^). |
| Copy line (yank line) | yy |
yl |
yl yanks the current line. |
| Paste line | p (below) or P (above) |
p (after) or P (before) |
Works similarly, but Helix pastes after/before the current selection (or cursor position). For a full line paste, the behavior is usually what you expect. |
| Copy text (yank selection) | y (after selecting) |
y |
Same letter, but you select first (e.g., w for word, gl for to end of line, or visual movements). |
| Paste text | p or P |
p or P |
Same as above. Helix also supports system clipboard via <space>p / <space>y (or configure defaults). |
Helix on OpenBSD & OpenRiot
Helix works beautifully on OpenBSD:
- Excellent performance on ThinkPads and Framework laptops
- Native OpenBSD packaging (
pkg_add helix) - Full Tree-sitter and LSP support for Go, Rust, Python, Lua, YAML, TOML, and many other languages
- No plugin manager headaches — everything just works
- Plays perfectly with i3, Alacritty terminal, and fish shell
Pro tip: Helix has one of the best default dark themes available. It looks right at home with OpenRiot’s dark aesthetic.
For the complete keymap and configuration options, visit the official documentation: https://docs.helix-editor.com/
See the helix-cheat-sheet project for a visual keybinding reference.
Tutorial Video: Helix Editor Crash Course
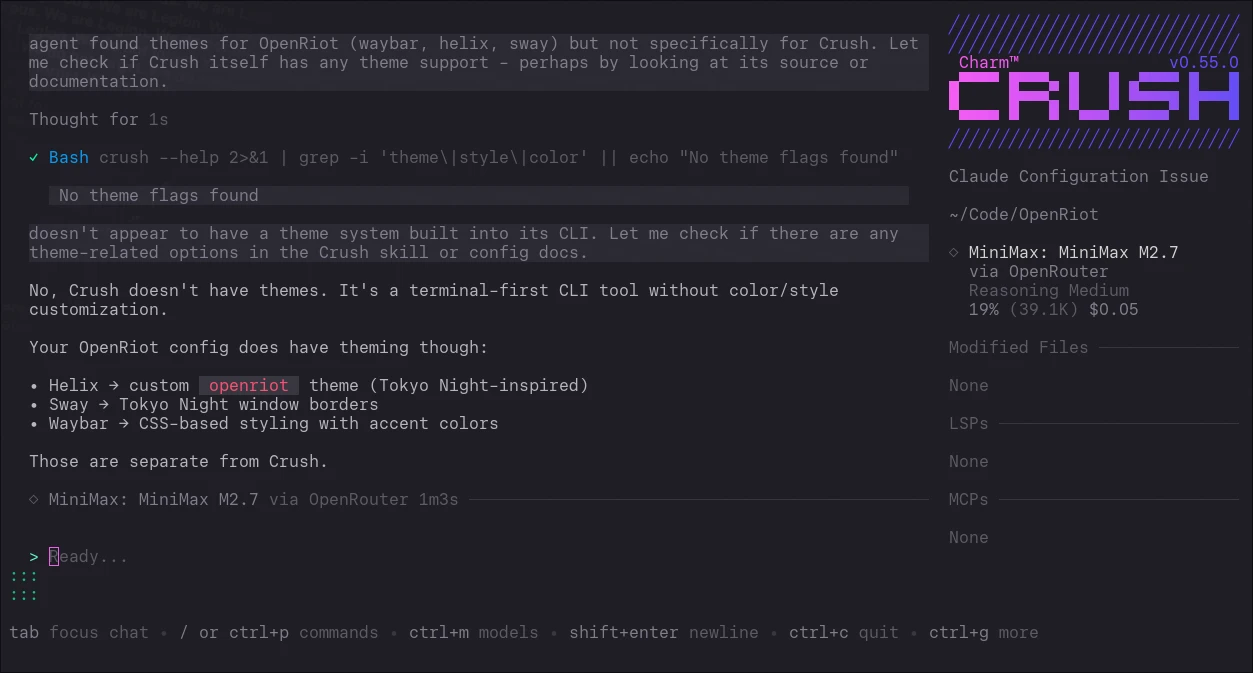
AI Integration with OpenRouter
OpenRiot bundles Crush for AI-assisted coding. Crush is a modern, lightweight, Go-based terminal AI coding agent with excellent OpenBSD support. It is built automatically during setup and installed to /usr/local/bin/crush.
Configure Crush
Create ~/.config/crush/config.yaml:
provider: openrouter
model: minimax/minimax-m2.7
api_key: sk-or-XXXXXXXXXXXXXXXXXXXXXXXXXXXXXXXX
Replace sk-or-XXXXXXXX... with your actual OpenRouter API key from openrouter.ai/settings
How to Use
Run Crush in a terminal:
crush
For a Zed-like experience, run Helix and Crush side-by-side in Zellij:
- Start Zellij with a vertical split
- Left pane:
hx - Right pane:
crush
Select code in Helix (y to yank), paste into Crush, and ask questions.
🔒 WireGuard VPN
OpenRiot includes a polybar module to toggle WireGuard VPN with a single click.
Prerequisites
- Install WireGuard tools:
pkg_add wireguard-tools - Create the config directory:
doas mkdir -p /etc/wireguard
Setting Up Mullvad VPN
- Generate your config:
- Go to mullvad.net/en/account/wireguard-config
- Select Linux platform (WireGuard works the same on OpenBSD)
- Click Generate Key
- Choose a server location (Country/City)
- Download the config file
- Install the config:
# Move the downloaded config to WireGuard directory
doas mv ~/Downloads/mullvad.conf /etc/wireguard/wg0.conf
Using the VPN
Polybar Module:
| Icon | Meaning |
|---|---|
| (hidden) | No config file |
| | Disconnected |
| | VPN connected |
Click the icon to toggle. You’ll see notifications for:
- “Starting WireGuard…”
- “Stopping WireGuard…”
- “WireGuard is not configured. Go to OpenRiot.org Read directions.” (if no config)
Additional status & verification commands (highly recommended):
# Quick interface status
ifconfig wg0

# Detailed WireGuard status (peers, latest handshakes, transfer)
doas wg show

# Test exit IP and leak detection
curl https://am.i.mullvad.net/json
# or
curl https://ipinfo.io

# Check if traffic is actually routed through VPN (compare with/without)
traceroute 1.1.1.1
Manual Commands
# Connect
doas wg-quick up /etc/wireguard/wg0.conf

# Disconnect
doas wg-quick down /etc/wireguard/wg0.conf

# Verify connection
curl https://am.i.mullvad.net/json
The output should show "mullvad_exit_ip": true when connected.
OpenBSD-specific nuances:
wg-quickon OpenBSD usesifconfig+routeunder the hood and works reliably with Mullvad configs.- DNS is handled via the config’s
DNS =line (usually pushed by Mullvad). If you useunboundor custom resolvers, you may need to adjust post-up scripts. - Kill-switch behavior is not automatic like some Linux tools; the polybar toggle + notifications help, but consider firewall rules (
pf.conf) for stricter enforcement if desired. - Performance: WireGuard is very lightweight on OpenBSD. Expect near-native speeds on decent hardware.
Auto-start at Boot
WireGuard automatically starts on boot if it was enabled when you last shut down.
How it works:
- Enable WireGuard via
Super+Ior the polybar icon → autostart flag is set - Disable WireGuard → autostart flag is cleared
- On next i3 startup, WireGuard comes up automatically after network is ready
No manual configuration required. The state is stored at ~/.config/openriot/wireguard.enabled.
Troubleshooting
VPN won’t connect:
# Check if config exists
ls -la /etc/wireguard/wg0.conf

# Check interface
ifconfig wg0
Slow speeds:
- Try a different Mullvad server location
- Some Mullvad servers may have limited bandwidth
📥 Transmission BitTorrent Client
OpenRiot includes the Transmission GTK client with polybar and rofi integration.
⚠️ IMPORTANT: Use with VPN
Transmission will NOT launch unless WireGuard is active. This is not a suggestion — it is enforced by the OpenRiot binary. If you try to start Transmission while the VPN is down, you get a 5-second critical notification:
Wireguard is NOT running. Cannot start Transmission without Wireguard. (This is a protective measure)
ISPs monitor BitTorrent traffic. DMCA notices are real. The old “always use a VPN” warning was easy to skip when you were in a hurry. OpenRiot now removes the temptation entirely.
To use Transmission:
- Click the VPN icon
in polybar or pressSuper+Ito connect - Wait for the shield to appear
- Launch Transmission from rofi or polybar
If WireGuard is already running, Transmission launches normally. If not, the client simply refuses to start and tells you why.
Polybar Module
The Transmission module auto-hides when the client is not running.
| Icon | Meaning |
|---|---|
| | Transmission running |
| (hidden) | Not running |
Click the icon to toggle. Notifications confirm state changes.
Rofi Menu
The app launcher (Rofi) also has a Transmission entry that dynamically shows:
- Transmission — Click to stop (running)
- Transmission — Click to start (stopped)
Default Settings
- Download directory:
~/Downloads - Blocklist: Enabled (courtesy of BT BlockLists)
Manual Commands
# Check if running
pgrep transmission-gtk
📂 Proton Drive Sync
OpenBSD has no native Proton Drive client. OpenRiot includes rclone for end-to-end encrypted bidirectional file syncing.
Complete Setup Guide
1. Create Proton Drive Folder
- Log into drive.proton.me
- Create a new folder named
ProtonSync(case-sensitive)
2. Configure rclone
rclone config
| Prompt | Action |
|---|---|
n |
New remote |
| Name | ProtonSync |
| Storage | protondrive |
| Proton email | Your email |
| Proton password | Your password |
| 2FA | Code if enabled |
3. Create Local Sync Folder
mkdir -p ~/Documents/ProtonSync
4. Initial Sync (dry-run first)
rclone bisync ~/Documents/ProtonSync proton:ProtonSync --dry-run --resync
If output looks correct, remove --dry-run --resync to sync.
5. Set Up Automatic Sync
Edit your crontab:
doas crontab -e
Add this line (replace username with your actual username):
*/15 * * * * /usr/local/bin/rclone bisync /home/username/Documents/ProtonSync proton:ProtonSync --fast-list >> /var/log/rclone.log 2>&1
6. Secure Your Config
chmod 600 ~/.config/rclone/rclone.conf
How It Works
- Polybar icon synced, needs sync, not configured
- Click the icon to sync (auto-init cache on first click)
- Files are encrypted client-side before transit (end-to-end encryption)
Sync Between Multiple Systems
rclone bisync is bidirectional — it syncs both ways:
- Local changes → Proton Drive
- Proton Drive changes (from other systems) → Local
If both systems edit the same file, rclone creates a conflict file (.sync_orig) that you can manually resolve.
Security Notes
- Your files remain encrypted end-to-end — Proton never sees unencrypted data
- rclone never sees your actual file contents
- Keep
rclone.confpermissions at 600 - Run rclone as your normal user, never root
📨 Signal with Gurk
Quick Overview: The Ultimate Signal Messenger Terminal Client Guide — great introduction by Bright Coding.
A pure-Rust Signal messenger TUI — zero Java, zero GTK/libsecret. Built for OpenBSD.
First Run
- Launch from the app launcher (SUPER+D) or run
~/.local/share/openriot/config/bin/gurk - On first launch it will prompt for a passphrase — select “Store it in config”, not “prompt” (prompt mode causes issues)
- Open Signal on your phone → Linked Devices → add a new linked device → scan the QR code
- Wait 2–3 minutes, then press
ctrl+pto open the channel list
Note: Gurk does not remember channels or messages on startup — it starts clean and only updates when you receive messages. If the channel list stays empty, press ctrl+p to force the popup, wait 30–60 seconds, or send yourself a test message from your phone.
Daily Workflow
| What | How |
|---|---|
| Open channel popup | ctrl+p (most important key) |
| Switch channels | ctrl+j / ctrl+k or Up/Down |
| Read messages | Scroll with alt+Up / alt+Down or PgUp / PgDn |
| Select a message | PgUp / PgDn |
| Reply | Type your message + Enter |
| Open a link | Enter with empty input |
| View attachment | Enter on selected message |
| Multi-line input | alt+Enter |
| Send a file | alt+Enter then file:///home/{user}/{path} |
| Attach clipboard image | alt+Enter then file://clip |
| React to a message | Select it → type emoji → tab |
| Copy message | alt+y |
| Open help | f1 |
| Deselect message | ESC |
| Mouse support | Click Edit field or Channel (not messages) |
Gurk supports the same emojis as Github. It’s a little daunting at first, but here’s a pretty comprehensive (and searchable) Emoji Cheat Sheet that makes it much easier.
Configuration
Create or edit ~/.config/gurk/gurk.toml to customize:
Recommended keybindings (add right above [keybindings]):
[keybindings.message_selected]
alt-e = "edit_message"           # Edit selected message
alt-y = "copy_message selected"  # Copy selected message
ctrl-t = "react :thumbsup:"      # React with 👍
ctrl-f = "react 🔥"              # React with 🔥
ctrl+h = "react :purple_heart:" # React with 💜
Popular settings:
[keybindings.normal]
ctrl-n = "select_channel next"   # Next channel
ctrl-p = "select_channel previous" # Previous channel
Reactions
React to messages by selecting them (PgUp/PgDn), typing an emoji shortcode, then pressing Tab:
| Shortcode | Emoji | Meaning |
|---|---|---|
:thumbsup: or :+1: |
👍 | Like / Agree |
:heart: |
❤️ | Love |
:laughing: or :joy: |
😂 | Funny |
:fire: |
🔥 | Awesome |
:rocket: |
🚀 | Great idea |
:eyes: |
👀 | Watching |
:clap: |
👏 | Well done |
:100: |
💯 | Perfect |
:ok_hand: |
👌 | OK |
:thinking: |
🤔 | Thinking |
:sparkles: |
✨ | New feature |
:bug: |
🐛 | Bug |
:wrench: |
🔧 | Fix |
:memo: |
📝 | Docs |
:white_check_mark: |
✅ | Done |
:construction: |
🚧 | WIP |
:tada: |
🎉 | Celebration |
:heavy_check_mark: |
✔️ | Verified |
Or just paste Unicode emoji with ctrl+Shift+V.
💳 Monero Wallet
OpenRiot includes the Monero GUI wallet pre-built for OpenBSD with full desktop integration.
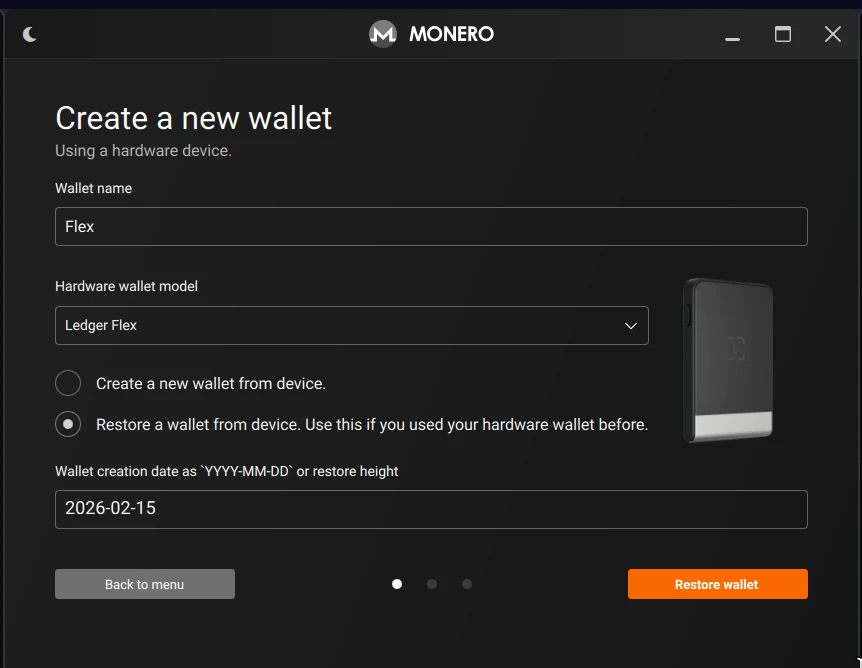
Launch
- Rofi: Press
Super + D→ select “Monero Wallet” - Desktop entry: Available in the app launcher with icon
Prerequisites (installed automatically)
The following Qt5 QML runtime packages are included in packages.yaml:
qtquickcontrolsqtquickcontrols2qtgraphicaleffectsqtdeclarative
Runtime Environment
The desktop entry sets QML2_IMPORT_PATH=/usr/local/lib/qt5/qml automatically so Monero GUI finds Qt Quick modules.
~/.local/bin is added to PATH in both ~/.xinitrc and ~/.xsession so rofi finds the binary immediately after install — no re-login required.
XDG_RUNTIME_DIR permissions are set to 0700 at session startup to satisfy Qt’s runtime checks.
Features
- Full node or remote node wallet support
- Integrated with polybar crypto module (shows when
~/.config/crypto.tomlexists) - Window icon mapping via
config/window/icons.toml
🎵 Music Player
OpenRiot now ships with a complete music player stack. MPD runs in the background, indexing your library and serving tracks over a local Unix socket. rmpc — a Rust TUI client — gives you fast, keyboard-driven control without ever leaving the terminal.
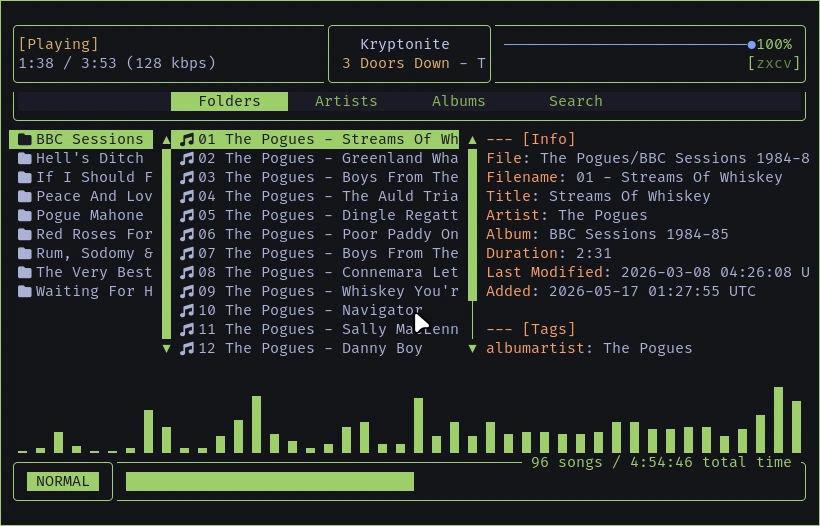
The stack comes with a Neo Tokyo theme that matches the rest of the
desktop. Launch it from the app launcher with Super + D → Music
Player, or press Super + Shift + K for instant access.
Features
| Feature | Description |
|---|---|
| MPD backend | Local music daemon with sndio audio output |
| rmpc frontend | Rust TUI client with vim-style keybindings |
| Neo Tokyo theme | Custom color scheme matching OpenRiot aesthetic |
| Library tabs | Folders, Artists, Albums, Search |
| Unix socket | Local-only, no network port required |
First Launch
- Ensure your music is in
~/Music(MPD scans this automatically) - Press
Super + Shift + Kor select Music Player from rofi - rmpc connects to MPD and shows your library
Music Organization
MPD expects a flat folder hierarchy for clean metadata scanning. Organize your library as:
~/Music/
├── Artist Name/
│   ├── Album Name/
│   │   ├── 01 Track Title.flac
│   │   └── 02 Track Title.flac
│   └── Single Name.mp3
└── Compilation/
    └── Various Tracks/
MPD will build its database from whatever it finds in ~/Music on
first start and whenever files change.
Daily Controls
| Key | Action |
|---|---|
Enter |
Play selected track |
Space |
Pause / resume |
n |
Next track |
p |
Previous track |
s |
Stop |
+ / - |
Volume up / down |
q |
Quit rmpc |
1-4 |
Switch tabs (Folders, Artists, Albums, Search) |
Tab / Shift + Tab |
Focus next / previous pane |
Configuration
MPD config lives at ~/.mpd/mpd.conf. rmpc config lives at
~/.config/rmpc/config.ron. Both are generated automatically during
install. The Neo Tokyo theme is at ~/.config/rmpc/themes/neo-tokyo.ron.
🎬 Screen Recording
Click the icon in polybar to start recording your screen. Click again to stop. No terminal needed.
How It Works
- Idle:
(teal, next to night-light) - Recording:
(red) - Output:
~/Videos/Recordings/YYYYMMDD-HHMM.mp4 - Video: H.264, 30fps, native resolution,
ultrafastpreset - Audio: AAC 192kbps via
snd/0.mon(when available)
Dynamic Audio Monitoring
Instead of permanently reconfiguring sndiod at install time, the recorder temporarily enables audio monitoring:
- Before recording: saves your current
sndiodflags, sets monitor flags, restartssndiod - After stopping: restores your original flags, restarts
sndiod
Your music and mic stay clean when not recording. The monitor only exists while you’re actually capturing.
Notifications
- Start: “Screen Recorder / Recording is starting…”
- Stop: “Screen Recorder / Recording is stopping… / Saved to: ~/Videos/Recordings/…”
Keyboard Shortcut
| Key | Action |
|---|---|
Super + Shift + N |
Toggle screen recording |
🖨️ 3D Printing
OpenRiot includes SolveSpace (solvespace) — a lightweight parametric 3D CAD modeler perfect for designing parts to print. No heavy install, no cloud lock-in.
- Docs: solvespace.com
The following printers are known to work with OpenRiot via SD card / USB transfer and open-source slicers:
| Printer | Type | Slicer | Price | Link |
|---|---|---|---|---|
| Prusa CORE One+ | Enclosed CoreXY FDM, active chamber heating | PrusaSlicer (native) | $999–$1,299 | prusa3d.com |
| Bambu Lab P2S | Fast CoreXY FDM, optional AMS multi-color | Bambu Studio / OrcaSlicer | $549–$799 | bambulab.com |
| Elegoo Centauri Carbon | Budget CoreXY FDM, 500 mm/s+ | PrusaSlicer | $299–$349 | elegoo.com |
| Prusa SL1S SPEED | Resin MSLA, high detail | PrusaSlicer | ~$700 | prusa3d.com |
| Anycubic Photon Mono M7 Max | Large resin LCD, fast curing | PrusaSlicer / Lychee | $799–$899 | anycubic.com |
| Elegoo Saturn 4 Ultra | Resin, tilting release, large platform | PrusaSlicer / Lychee | $279–$400 | elegoo.com |
| Bambu Lab A1 Mini | Compact FDM, quiet, multi-color capable | Bambu Studio / OrcaSlicer | $219–$399 | bambulab.com |
Install PrusaSlicer if needed:
doas pkg_add prusaslicer-2.9.4p2
🔧 Troubleshooting
Upload Logs for Support
If something goes wrong, upload your log file for debugging:
# Setup log location
cat ~/.cache/openriot/setup.log

# Install log location
cat ~/.cache/openriot/install.log

# Share install log
~/.local/share/openriot/install/openriot --share-log install.log
This will upload the log to tmpfiles.org and give you a URL to share.
Hostname shows as x.my.domain
If the hostname prompt was left blank during install, OpenBSD sets a default domain of my.domain, making your hostname look like openriot.my.domain.
Fix:
doas vi /etc/myname
# Change: openriot.my.domain
# To:     openriot
# Then reboot.
Multiple wsmouse devices in settings
You may see wsmouse, wsmouse0, wsmouse2, wsmouse3, etc. in mouse settings. This is normal OpenBSD kernel behavior.
wsmouse— kernel mux devicewsmouse0— trackpad touch surfacewsmouse2— TrackPoint (red nub)wsmouse3— physical button / clickpad protocol layer
The gap at wsmouse1 is skipped enumeration. Nothing is broken.
WiFi not working
-
Check if WiFi is recognized:
ifconfig | grep -E "^iwm[0-9]" - If no WiFi device shows:
- Your adapter may not be supported (see hardware list above)
- Try a USB WiFi adapter from the supported list
- Check
dmesgfor hardware errors
-
Connect to WiFi:
OpenRiot uses ifconfig for WiFi management on OpenBSD.
Click the network icon in Polybar or run
ifconfig iwm0 up+fw_updateto set up WiFi.# Connect manually via hostname.if(5): doas vi /etc/hostname.iwm0 # Add: nwid "YourNetworkName" wpakey "YourPassword" dhcp # Add: inet autoconf # Add: mode 11g # Then: doas sh /etc/netstart iwm0 - After connecting:
 # Verify connection
 ifconfig iwm0
 ping -c 3 cdn.openbsd.org
Mouse freezes or jitters
If the mouse hangs after idle, then jitters/glitches when moved:
- Check for USB conflicts:
# List all USB devices and their controllers usbdevs -v # Check if mouse and other devices share the same USB bus dmesg | grep -E '^(uhub|usb).*port' # View detailed USB tree usbdevs -d - Common fixes:
- Move devices to different USB ports/controllers
- Avoid using the same USB hub for mouse + network adapter
- Check
dmesgfor USB errors:dmesg | grep -i usb
- Verify mouse detection:
wsconsctl -m
Firefox can’t see Downloads folder
If Firefox shows a blank path instead of ~/Downloads:
# Fix the user-dirs.dirs file
cat > ~/.config/user-dirs.dirs << 'EOF'
XDG_DOWNLOAD_DIR="$HOME/Downloads"
EOF

# Make sure Downloads exists
mkdir -p ~/Downloads

# Restart Firefox
pkill -9 firefox
firefox &
Firefox tabs crash on heavy sites (Grok, X, Canvas apps)
OpenBSD’s GPU stack frequently triggers WebRender crashes on WebGL/Canvas-heavy sites. If you see Gah. Your tab just crashed., disable hardware acceleration:
via about:config:
about:config → gfx.webrender.software → true
via Settings: Settings → Performance → uncheck “Use recommended performance settings” → uncheck “Use hardware acceleration when available”
Why: Xenocara’s GPU drivers and Firefox’s WebRender compositor don’t always play well together on OpenBSD. Software rendering is stable and fast enough for desktop work.
i3 won’t start
-
Check for errors:
i3 2>&1 | head -50 - Common fixes:
- Graphics driver issue: Check X11 logs at
/var/log/Xorg.0.log - Verify DISPLAY is set:
echo $DISPLAY
- Graphics driver issue: Check X11 logs at
- Check dmesg for hardware issues:
dmesg | grep -E "error|failed|intel|amd|nvidia"
Package missing
If pkg_add fails:
-
Verify installurl is set:
cat /etc/installurl # Should show a mirror URL -
Auto-select fastest mirror:
doas openriot --mirrors -
Or set it manually:
echo https://cdn.openbsd.org/pub/OpenBSD | doas tee /etc/installurl -
Try again:
pkg_add -v <package-name>
System Benchmark
Run benchmark to test CPU, memory, and disk performance. Requires sysbench:
doas pkg_add sysbench
benchmark
Run via terminal or app launcher:
openriot --benchmark
Results go to ~/.benchmark/<hostname>-YYYYMMDD-N.log with full system specs.
| Metric | mini (N150, 4c) | t14 (i5-10310U, 8c) | Winner |
|---|---|---|---|
| CPU (prime 20k) | 0.0029s | 0.0020s | t14 (31% faster) |
| Memory ops/sec | 4,018,316 | 4,743,669 | t14 (18% faster) |
| Memory MB/s | 3,924 | 4,632 | t14 (18% faster) |
| FileIO (rnd) | 2,206 req/s | 3,561 req/s | t14 (61% faster) |
| dd write | 236 MB/s | 335 MB/s | t14 (42% faster) |
| dd read | 169 MB/s | 2,584 MB/s | t14 (15x faster) |
Harden SSH (Disable Password Authentication)
OpenRiot leaves SSH password authentication enabled by default (the OpenBSD standard). If you plan to expose this machine to the internet or prefer key-only access, disable passwords before you remove the ability to log in.
1. Generate and copy your key first (on your client machine):
cat ~/.ssh/id_ed25519.pub | ssh user@openriot-machine "mkdir -p ~/.ssh && cat >> ~/.ssh/authorized_keys"
2. Disable password auth on the OpenRiot machine:
doas sh -c 'echo "PasswordAuthentication no" >> /etc/ssh/sshd_config'
doas rcctl restart sshd
3. Verify you can still log in from your client:
ssh user@openriot-machine
# Should NOT prompt for a password
Locked yourself out? Access the physical console, log in locally, and re-enable:
doas sed -i '/PasswordAuthentication no/d' /etc/ssh/sshd_config
doas rcctl restart sshd
Note:
PermitRootLogin nois already set by OpenBSD default. This section hardens normal user access.
🛡️ Xenocara’s Hardening (OpenBSD’s Custom X11 Server)
Xenocara is not vanilla X.Org. It is OpenBSD’s integrated, heavily patched build of the X server with these security features:
- Privilege separation: The server runs with minimal privileges; input and rendering are isolated.
- Pledge(2) and unveil(2): The X server itself and many clients are sandboxed.
- No unnecessary setuid root: Modern Xenocara drops privileges aggressively.
- Stronger default configuration: Fewer extensions enabled by default, audited for local attacks.
This makes the underlying X server far more resistant to client-side abuse than stock Xorg on Linux. Xenocara users generally consider it one of the more secure X11 implementations available.
💎 Donations
OpenRiot was built by one person over hundreds of hours. OpenRiot is the first truly usable OpenBSD system with a working window manager, curated applications, and a complete desktop workflow — no compromises, no Linux copium. If it saved you time, consider donating (in Bitcoin):
bc1qscxvn9clw6n3a4kykl2nlu8w2f2aqdftfp4hyq